
Comments
No comments posted yet.
Certain features of a mountain – its prominence, a certain ridge, rib, or gendarme, will make the aspect of the mountain worth looking at and climbing. Its these features that make us better mountain climbers – something you can see from basecamp or the approach that just looks daunting or revelsome. If you're on a mountain and climbing the standard route, ask yourself, is this the best way to climb up this mountain? On many mountains, there can be a more inviting third class variation, and that could easily be called the standard route if you deliver it to the right people. So make your own route up, and make sure its the best. Here are a few examples of mountains who's standard routes have changed over the years, and why.
In general, deciding which route to take to the top is an important part of the climb. It never fails to surprise that the closer you get to a mountain, the easier it will look. Mountains often appear difficult from far away because the features that would be climbed are not obvious, but as a climber approaches the mountain, and these features become visible, one can start planning their route. A clear route all the way to the top must be visible. Once you can see it, its yours. Err on the side of caution, because there may be impassable section that is out of view.
The standard route will always be the easiest route to the summit. This won’t necessarily be the most challenging or interesting route, though, and its imperative that you make your own choices about how to get to the summit. Especially if you’ve climbed something before, like your favorite. Why do the Standard Route again, when you know it is crowded and you know every step of the way? Make your own standard route, and keep improving on the way. You can do a variation like the Mountaineer’s Route on Mt Whitney, instead of the Class 1 trail. If en route on a Class 2 you see some Class 3 go ahead and make your own variation to challenge yourself, so that you can go down the easy way.
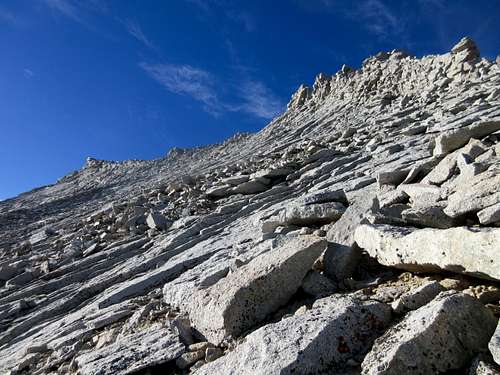
Many hikers can transition to Class 2 easily, which is off-trail. As soon as you have to find your own route, this is considered cross-country travel, which requires you pay more attention to the direction of travel and the actual route. An approach like hiking to a peak from a pass is usually Class 2. It will be all rock, more vertical and while easy it requires you get yourself there, negotiating loose talus and blocks that require balance to walk upon. It requires more awareness of where mass is and how to move it. Also, loose scree and sand takes a lot of effort to move in and can be time consuming.
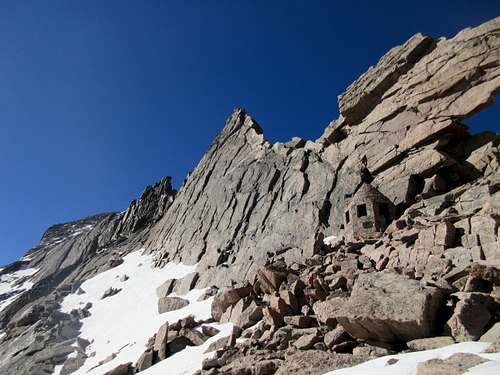
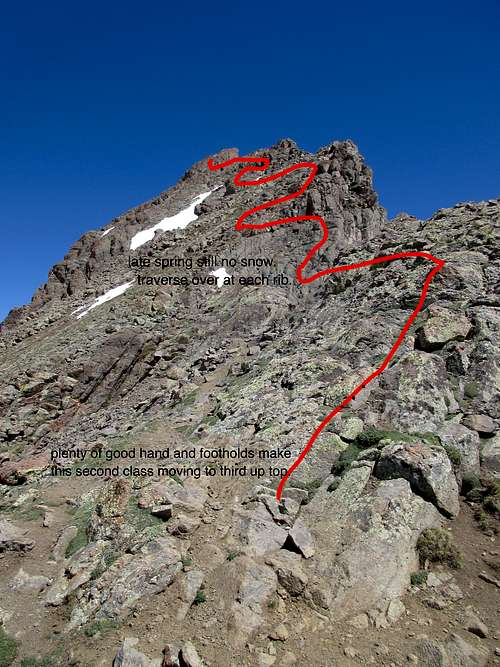
Some hikers don’t like Class 3 rock, but that is where they turn into climbers. There is usually Class 2 leading to Class 3, so you can get warmed up. Class 3 requires hand holds to hang onto rock. This can also involve steeper routes, larger vertical steps, and exposure. Mountains like Middle Palisade, the Matterhorn and Mt. Mendel in California as well as the Wetterhorn in Colorado are typical Class 3, meaning the easiest route to the top is Class 3. The more sustained a climb is on Class 3, the harder it is. There is still a lot of room for variation on a class 3 mountain, and including approach, can add more to your day. In general rock climbs get tougher as you approach the top. A good example of this is Middle Pallisade in CA, and the Wetterhorn in CO, both of which have sustained Class 2 leading to a steeper Class 3 arête, increasingly more difficult near the summit. On both, the rock is generally the same, but the steps grow to more rise than run on the approach to the Summit.
Its once these routes become long, sustained, exposed, and have only one path that a real challenge begins. Now, you have to climb a certain piece of rock - this can be a crux move that requires a technique like a power move, mantle, jugging, or climbing a crack. These skills will allow a climber to ascend a piece of rock that will take them to the summit, and either they know it, or they don’t. With most climbers, if they’re with an experienced leader, by virtue of seeing them climb it, they will be able to replicate a move. Climbers learn very quickly visually, and seeing someone else perform a move is often all they need in order to get it done themselves. With more complicated moves that take 3 or 4 different hand or footholds in succession, they can be talked or coached through it, just by pointing out where the hand and footholds are. Middle Palisade is sustained Class 3 for 2000 feet, and it makes for a very good climb. Route-finding is critical to get to the right chute to get to the summit, and the climbing is generally very vertical with large ledges and blocks for footholds and stepping onto. Any route up the main chute is on the standard route, but again, debate exists as to the correct or best path up. Not necessarily the least technical, which would be a scree field, but which chute or which approach is the best aesthetic line.
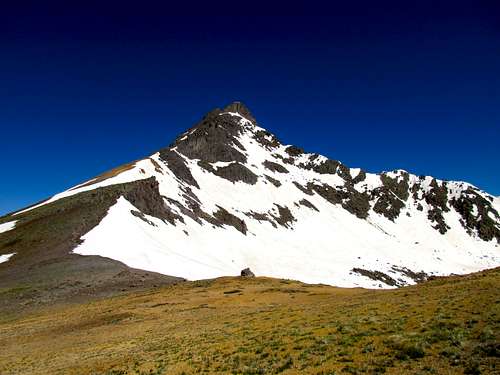
Mt. Williamson has also had several debates. The original route climbed on Williamson was the Bolton Brown route, which went up a scree couloir for most of the climb, then follows ledges around to the summit platform. With very little actual rock climbing, the next route pioneered by Joseph LeConte just 7 years later, the West Face, makes a lot more sense. Not only is it more direct, it has more time on the rock, and for a mountain this size, is estimable for it. It makes sense that this is now the Standard Route, and we should know so much, and decide for ourselves on any mountain which route deserves to be the standard route. The correct route, as I see, is West Face, which is a long Class 2-3 chute, with a summit plateau that can only be reached by climbing a crack with chockstone for 60 feet. There are two to three sections where one can rest and figure out the next few moves, so it isn’t that bad. One only needs to figure out two or three moves at a time, and then they can rest and get more perspective. The crack is vertical, although there are excellent hand and footholds, and the descent is easy and protected, with very little exposure. The increased vertical requires two hands and feet, with finger moves, traversing, and power moves or shimmying or stemming, which require commitment. No rope is required, but the climber must possess the strength to move their body vertically while holding onto rock.
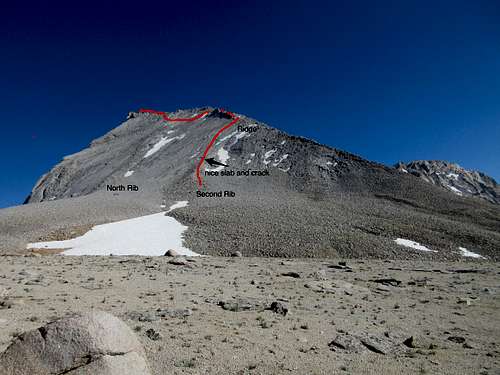
A good place to practice route finding and route making are on mountains that are graded, so that each route gets progressively harder as you get towards the face. An example is Mt Tyndall. This lets you dial in as much difficulty and exposure as you want, and pick your route as you go. The North Ridge is Class 2, while the North Rib is Class 3. Further out, the North Face routes are Class 5+, and so route selection becomes important here. The selection of routes really comes down to the amount of challenge you want on any given day. Just because there is a Class 2 route up a mountain doesn’t mean you should take it. If you have the ability to climb Class 3 and Class 4 rock, you should do the more difficult route, and then take the Class 1 or Class 2 route down. This will allow you to see more of a mountain and its views. You'll have more to talk about on the descent, too. Remember, its not just about climbing a peak, its about an interesting day of climbing. You'll learn more as you continue to challenge yourself. On a trip with a big group it helps to stick together, and you may find yourself helping other folk climb up sections. But when out with friends, always choose the harder route.
When you add in snow and ice climbing, with Winter weather, mountains can be even more challenging to climb, with Mount Ranier a classic. The possibility of crevasses, unstable snow, make it a more challenging climb, and with snow covering the top 4000 feet of the mountain, it takes a lot more effort to climb. Knowing how to climb harder and harder routes, and mountains, means that someday maybe you'll reach a goal like trekking, or climbing a 6000m peak, or even higher.