
-
 47895 Hits
-
 91.45% Score
-
 35 Votes
|
|
Mountain/Rock |
|---|---|
|
|
48.81230°N / 121.3232°W |
|
|
Hiking, Mountaineering, Trad Climbing, Ice Climbing, Mixed, Scrambling, Skiing |
|
|
Spring, Summer, Fall, Winter |
|
|
8280 ft / 2524 m |
|
|
Overview
Located near the southern end of the Northern Pickets, Mount Fury is wild, rugged and remote. In fact, this is one of Washington's most remote climbs and while the technical pitches are few, the overall length of your climbing days (both in time and miles) are so great that even the fittest climbers will get the "expedition" feeling by day three. If you are in excellent shape, experienced and not afraid of being days away from rescue, Fury (along with Luna Peak) is the quintessential Cascades trip. Fury is a wonderful mixture of hiking, bushwhacking, scrambling, camping, rock climbing and glacier climbing.
Mount Fury has two distinct peaks that are worlds apart. The east peak, which is the easier of the two can be done on a traverse of the Picket Range with Class 3 scrambling and a steep glacier climb, or via a more direct route that avoids the steep glacier and ascends Class 3 rock with 20 feet of low 5th class rock (see Route Options below).
The west peak however should probably be its own peak. Topping out at the same 8,280 feet as the east peak, no one really knows which one is higher, despite the west peak being the one labeled on the USGS map. To ascend this peak will require nearly a full extra day (beyond the 2-3 days it takes to just get to the east peak) and involves hours of tough exposed scrambling with some 5th class rock climbing (both up and down) up to around 5.4 (although the entire route is sometimes solod). As of 2016, the west peak has seen less than 20 successful parties reach its lofty summit, and it's included in the original "Difficult 10; Washington's Hardest Peaks list" compiled by WA climber Dallas Kloke. Although some of the peaks on this list are very arguable, West Fury is not one of the peaks people think twice about regarding its inclusion on the list.

Getting There - Big Beaver/Access Creek Approach
From Seattle, go north and take SR 20 (North Cascades Highway) towards Ross Lake. Park at the Ross Lake Resort Trailhead 13.4 miles east of Newhalem. The folks at Ross Lake Resort run a ferry boat that can take you and your gear up Ross Lake to the Big Beaver Trailhead. Making a reservation for the boat ride is highly recommended simply so they know to pick you up. The cost is now $60 per ride regardless of how many climbers are on the boat (a group of 6 and huge packs fills the boat nicely). You should set an arranged time to meet the ferry and be sure to account for the 20 minute hike on the trail leading down to the lake shore from the highway parking area. Upon arriving at the dock, there is a phone attached to a pole you can use to call the Ross Lake Resort office (located across the lake) so you can let them know you're ready, and they will send a driver with the boat to pick you up. Alternatively, if you are on a budget you can also skip the boat ride and hike the lakeshore trail, which follows the west side of Ross Lake, for 7 miles one way to the start of the Big Beaver Trail. The trailhead parking is the same. This adds 2-3 hours each way to the journey.
Once you reach the Big Beaver Trailhead (20 minutes on the boat; elevation 1,600 feet), hike up the very mellow trail through nice old growth forests for 8 miles to the established Luna Camp. An additional 1.5 miles north of Luna Camp along the trail, you will leave the comfort of easy walking and begin the real adventure. Try to locate a small boot path heading left, and cross Big Beaver Creek just north of where Access Creek enters Big Beaver Creek. Some years you can find a convenient log to cross, and some years you will have to wade. This crossing is around 2,460 feet in elevation. Hike along the north flank of Access Creek in semi-open forest. Near 3,700ft, where travel becomes very brushy, cross to the creek to its south bank.
From here, look for cairns and a faint trail that will utilize talus fields and avoid much of the slide alder brush and deposit you into the upper basin at the headwaters of the creek. There is good camping here. If you cannot locate the small boot path, you will be in for some annoying bushwhacking most of the way but it never gets truly unbearable as long as you stay on the north side of Access Creek up to 3,700 feet where you will definitely want to cross to the south side. From the Access Creek headwaters at about 4,400 feet, ascend southwest up broad talus (or snow) gullies heading up towards a noticeable gap in the ridge. Once on the ridge, traverse south of Point 6,730 on grass and heather and emerge into a large basin to the SE of Luna Peak. Traverse across this basin at the 6,600 foot level towards Luna Col, which is the obvious notch between Luna Peak to the right and a small tower to the left. There is a great spot to camp at this col, or just 150 feet below it on the east side. From here you can ascend the south ridge of Luna Peak before continuing on towards Mount Fury. See the detailed map below for good info on the approach.
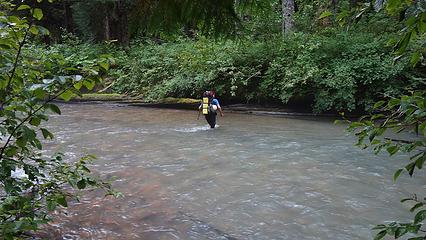 Wading Big Beaver Creek Wading Big Beaver Creek |
 Elephant Butte Elephant Butte |
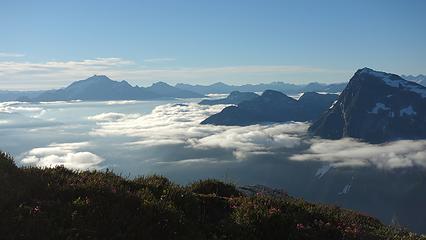 View from Luna Col camp View from Luna Col camp |
East Fury from Luna Col
From Luna Col, you must traverse around the east and south side of the long ridge connecting Luna Peak and East Fury. Drop a few hundred feet east from Luna Col until you can begin heading right, then traverse around the 6,600 foot level across numerous ribs, gullies and small basins until you reach the crest of a subsidiary ridge extending down to the southeast. There will be much third class scrambling and many short up and downs to connect the traverse. Routefinding will be somewhat tough however I suggest staying higher, close to the base of the steep cliffs that leads very steeply up to the ridge crest. Note this will all have to be done with your multi-day packs! This SE/NW trending ridge marks the halfway point to the start of the final ascent to east fury. The next part of the traverse you simply cross the large basin right in front of you, dropping no lower than 6,300 feet. If you're lucky, there will be some remnant snow you can utilize to get across faster (max 20 degrees in steepness; a trekking pole and maybe microspikes is all you need), otherwise it's more loose talus. From the center of this basin you have two options.
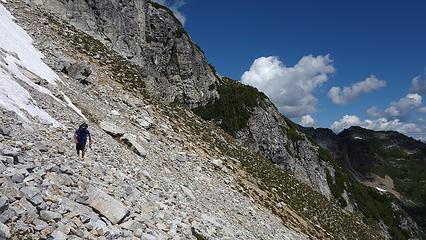 Traversing towards Mount Fury Traversing towards Mount Fury |
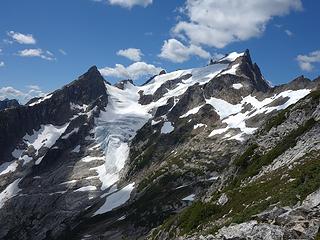 View of Mount Fury from the small ridge View of Mount Fury from the small ridge |
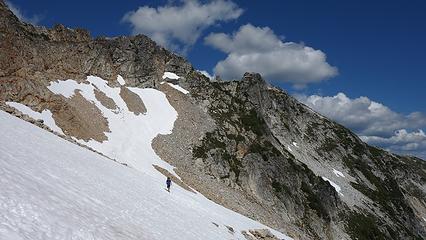 Traversing the large basin Traversing the large basin |
Route 1 - East Ridge Direct - Class 5.4 - Easy Snow
This route is good to take in mid-late summer if you did not bring boots and crampons since it avoids the steep ascent up the lower Fury Glacier described in route 2 below. From 6,300 feet in the center of the basin described above, make an ascending traverse northwest to a notch at 7,050 feet just east of Point 7,850 (a sub-peak on the east ridge of East Fury). The snow steepens to 35 degrees or so higher up in the basin, so if there is lingering snow patches an ice axe will still probably be needed, but microspikes on your tennis shoes should be enough traction. From this notch (which is visible in the upper right part of the center photo in the table just above), walk across a wildly exposed "sidewalk in the sky" feature until you reach the base of a 20 foot rock step that requires 5.4 rock climbing on decent, but true vertical rock to surmount. With a couple good medium sized cams it protects well. Once above this step, the technical climbing ends and you can scramble up the east ridge all the way towards the top of Point 7,850 on Class 3-4 terrain (albeit very loose at times). Stay just to the left (south) side of the ridge crest most of the way and do not go all the way to the summit of this small peak. Cross over to its west side via a ledge 50 feet south of the highest point and scramble 100 feet down a stupidly loose Class 3 gully to the flat upper Fury Glacier below. The photo to the right in the table below shows a snow finger extending partway up. You can scramble in the moat to the side of this snow on loose scree to avoid descending steep snow in August or later.
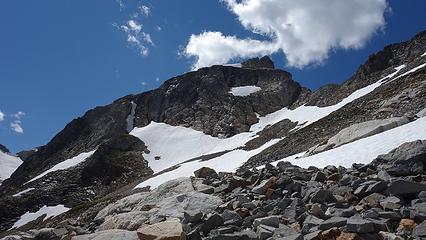 Looking up the large basin to the 7,050 notch Looking up the large basin to the 7,050 notch |
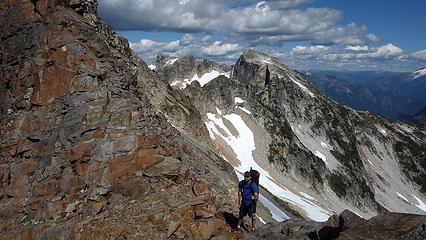 At the 7,050 foot notch with part of Luna behind At the 7,050 foot notch with part of Luna behind |
 West side of Point 7,850 with the large gully visible West side of Point 7,850 with the large gully visible |
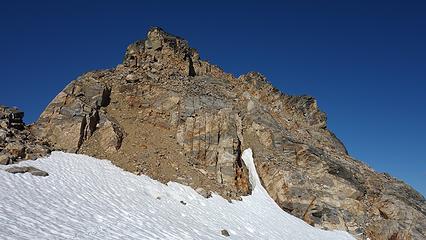
Once on the flat part of the upper Fury Glacier you can make a mellow ascending traverse to the WSW heading below the wild looking tower just above you (left photo in the table below). This is the slightly lower north summit of East Fury, and it looks significantly more impressive. It resembles the large buttress of rock extending out of Gondor in the LOTR movies. Continue traversing left below the cliff band to the large boulders near the south ridge of East Fury, which tend to melt out by August, and finish the final 350 feet to the summit on the south ridge (Class 3) avoiding the steep snowfield draping off the summit above the cliff band. The boulders in this area are very loose so be careful. See the orange portion of the map below labeled day 3 for a detailed map of this traverse from Luna Col to East Fury.
The map below shows this route in red and orange.
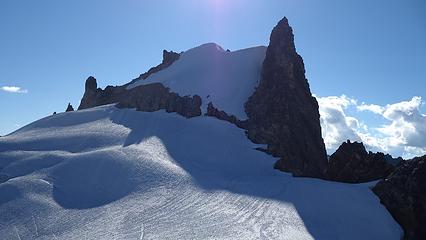 Summit of Fury (left) and impressive tower (right) from Point 7,850 Summit of Fury (left) and impressive tower (right) from Point 7,850 |
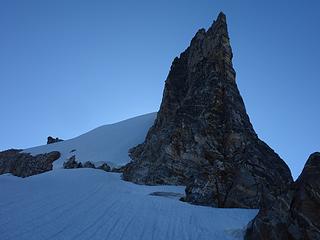 Traversing under the impressive tower Traversing under the impressive tower |

Route 2 - Fury Glacier - Class 3 - Steep Snow/Ice
If you are making the trip to Mount Fury in earlier season (May - July), it will probably be easier to simply climb the entire Fury Glacier to the upper south ridge as described above. From 6,300 feet in the large basin, instead of ascending the basin to the notch and climbing over Point 7,850, continue traversing at the 6,600 - 6,800 foot level below the cliffs coming off the SE buttress of Point 7,850. Emerge onto the glacier and climb the easiest line up to the flat portion of the glacier around 7,750 feet nd continue to the sumit of East Fury per Route 1 described above. Steel Crampons and an ice axe are mandatory for this ascent, and if the glacier is icy, mountaineering boots may also be required but would you really want to walk with boots on the entire way just to ascend one glacier? Consider Route 1 above if planning to climb Fury after July.
The summit of East Fury is probably one of the best places you can imagine to camp. The top of the uppermost snowfield flattens out a few feet below the highest point enough to fit a tent, and if snow camping doesn't sound fun there s a large rock slab 20 feet south of the highest point large enough to pitch a small tent.
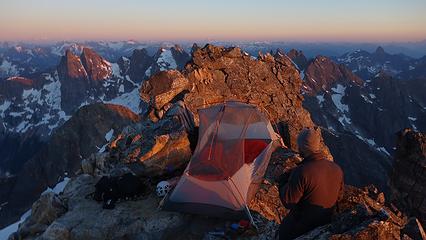 Camping on the flat rock slab Camping on the flat rock slab |
Also, there is an additional approach that may or may not be easier. See this Easy Ridge/Challenger Glacier route. From Challenger Arm drop down and take a line leading you to Luna Lake, where you can camp and consider climbing the North Buttress route up East Fury.
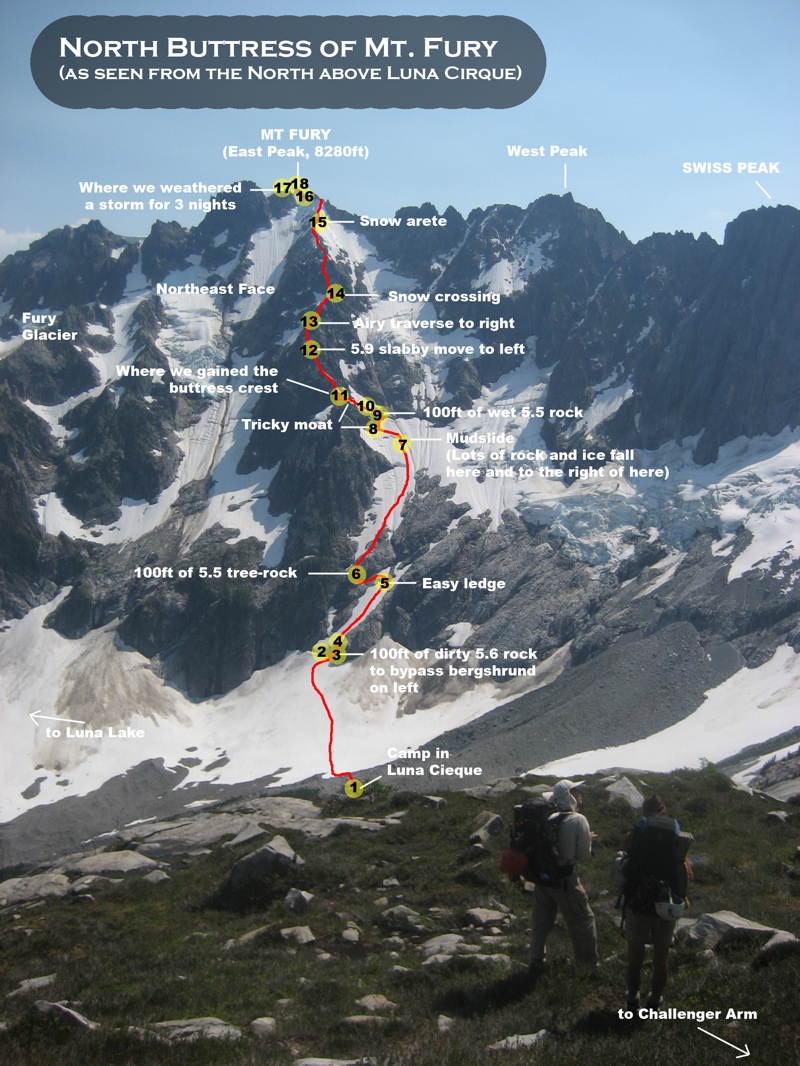 North Buttress of East Fury Route Topo
Routes up West Fury
Once you have reached the summit of East Fury, you may be thinking you would like to continue to West Fury (if you have the energy/time). If so, the traverse between the two summits is a wild and fun scramble with decent exposure and some more technical difficulty than what's found on the ascent up East Fury. For the sake of keeping this magical peak somewhat obscure, I won't babble on and on about a step by step route description, but rather just show a route topo. In short, the descend off East Fury to the low saddle is on very loose Class 2-3 boulders. There are then three towers you must climb up and over before making the final ascent to the summit of West Fury. A 50 or 60 meter rope is recommended at the very least for rappelling the 4th and low 5th class areas you climbed. If you need the protection of a rope climbing up the more difficult portions of the traverse, schedule a full day for the traverse to West Fury and back to East Fury. If you are comfortable soloing all the up-climbs, it can be as fast as a half day.
The red line shows the traverse from East to West Fury with the green sections showing areas I believed to be low 5th class. The yellow line shows a route to Picket Pass from the saddle between the two summits. This route is becoming more popular as it allows you to bypass all the difficulties of climbing over Outrigger Peak on a full traverse of the Pickets. It involves a steep descent down slabs/gullies/talus from the saddle, then traversing SSE over endless steep, red colored talus too Picket Pass. Expect some Class 3-4 on this route, however if you're making a full Pickets traverse you can take your packs to the saddle and drop them there while you ascend West Fury, and bypass Outrigger Peak. As of 2016 less than 20 parties reached the summit of West Fury...Enjoy the summit if you are able to make it.

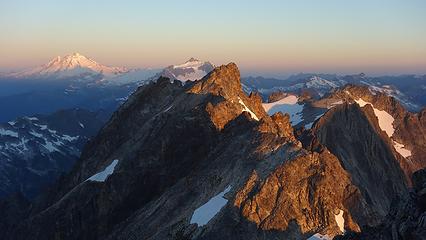 Sunrise on the traverse to West Fury Sunrise on the traverse to West Fury |
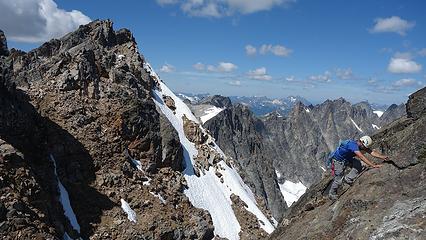 Scrambling on the traverse Scrambling on the traverse |
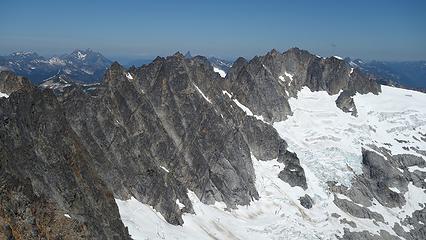 Mount Challenger from West Fury Mount Challenger from West Fury |
Camping/Red Tape
Camping in Access Creek Basin is wonderful but expect small critters that might try to get your food. Water is not a problem as the creek flows nearby.
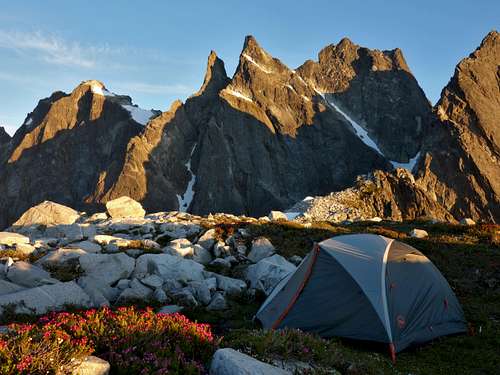
Camping at Luna Col is incredible and thanks to a small snowfield right at the saddle, there is normally running water. Only bad thing here is there isn't many flat spots for a tent. Don't expect a meadow; just rock and great views.
The summit of East Fury also has superb camping, either on a large flat boulder 20 feet below the highest point or on the top of the snowfield that terminates just 5 feet from the highest point.
There are limits as to how many people can enter the wilderness and group size is limited as well so please check with the rangers in Marblemount. It is also safe to say that during the Summer months, open fires are not allowed. The phone at the Ranger Station is (360) 856-5700 or you can call the visitor information at (360) 856-5700. There is no need for a parking pass. The boat, while not technically "red tape" needs to be taken care of in advance as well. So call Ross Lake Resorts at (206) 386-4437.
When To Climb
Spring/Summer is the best time. In early season, expect snow from Luna Camp and beyond, requiring heavier boots, ice axe, and possibly snowshoes/skis. Bushwhacking through wet bush and devil's club is not many people's idea of fun so if it recently rained be prepared to get soaked! Climbing Fury (or anything in the North Cascades) in November/December would be the worst time as not enough snow would have fallen for an enjoyable winter outing.
Other Important Information
This description of the North Cascades is one of the best I have read anywhere. Read it closely and take it to heart. For more, visit Mount Challenger.
"This area is the most rugged and remote mountain wilderness in the lower 48 states (somewhat arguable, but not very), deep in the northern section of North Cascades National Park. Challenger and the majority of the Pickets are not visible from any road and no trails offer particularly good views of the area. The climate is quite atrocious, probably the worst in all the Cascades. The valleys surrounding the Pickets are filled with wild and all but impenetrable temperate rainforest choked with brush and blowdown. The terrain is steep and cliffy from valley bottom to peak and the whole area is riddled with wildly disrupted glaciers calving off seracs to the valleys far below. There are no walk up routes in the Pickets. Here one must deal with the peaks on their own terms, over days of real hardship. All of this conspires to make climbing in the Pickets a unique, incredible, but challenging experience at best, and a full on epic at worst. The vibe here is very different than anywhere else in the Cascades. There are fewer climber's trails, more and rougher ground to cover, and less people." - meganerd
External Links
My Trip Report detailing a full north to south Pickets Traverse
mvs - Feb 6, 2006 5:42 am - Voted 10/10
Untitled CommentI'd like to recommend that description on Sverdina's page that you linked to. It describes the Wiley Ridge approach very well, we used it for our ascent.
mvs - Feb 6, 2006 5:47 am - Voted 10/10
Untitled CommentHi Noah, awesome page! I'd like to emphasize that there are two peaks for Fury, the East and the West. Both your ascent and my own are of the East Peak. The West Peak is very rarely climbed, as it's reported to take a full day to get there and back from the summit of the East Peak, on a long, convoluted ridge of scrambling and low 5th class.
I don't want to diminish from our accomplishments on the East Peak, rather I want to point out that there is an additional challenge here regarding Fury, that just increases the grandeur of this mountain.
I believe the West Peak has the same elevation, so it wouldn't be important from a peak-bagging sense. I'd be interested in any pictures of that peak, somewhat shrouded in mystery!
Noah (Oregon) - Feb 7, 2006 3:01 pm - Hasn't voted
Untitled CommentGreat point! I hope that people will continue to submit info on that other peak. I am only a hack compared to the hard core guys who do both peaks. If you know someone who did both, have them submit some beta or photos. Thanks again for the good addition. - Noah
mvs - Feb 7, 2006 5:33 pm - Voted 10/10
Untitled CommentNah, it is just something to do next time you get back in there, I'll bet it would be simulclimbing terrain the whole way - just longer than heck. We actually camped right on the summit, so had we been less keen to press on to the south, we could have made a "day trip" over to that summit and back. Alas, hindsight is 2020 :D.
There _are_ other ways that don't require tagging east peak, they are just awaiting first ascents. :)
anthony_mendoza - Mar 26, 2018 9:04 pm - Voted 10/10
Thanks MattGreat write-up. It is beyond cool to me that you would call the route that Alan Fries and I first climbed back in 1975 the "Standard direct route". Wow! Since we didn't have any iron protection with us at the time (just soft stuff), that step was a major obstacle. What you don't say is that it is incredibly exposed in both the North and South sides. Alan told me to jump to the North if he fell on the South side and to the South if he fell to the North. After sweating a pint, Alan made the crux and we scrambled up to the summit, tagging point 7850 on the way. We were the 26th accent of East Fury and the original piece of paper with the names of the first accent party (the Ptarmigan Climbing club from the 1930s) was still there.
Matt Lemke - Dec 25, 2018 7:37 am - Hasn't voted
Re: Thanks MattOh yeah that was a fun little climb for sure! It's definitely the way to do if you don't have crampons or boots like we did.