|
|
Route |
|---|---|
|
|
47.48750°N / 120.7831°W |
|
|
Trad Climbing |
|
|
Summer |
|
|
Half a day |
|
|
5.9 (YDS) |
|
|
III 5.9+ |
|
|
6 |
|
|
III |
|
|
Overview
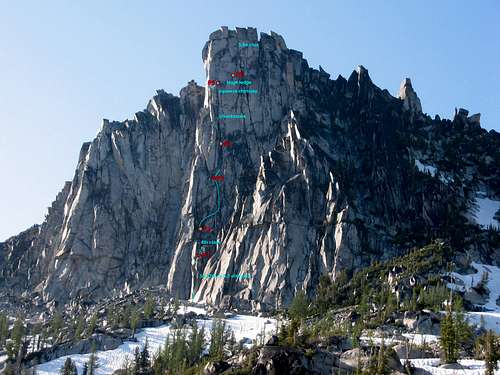
Also known as the South Face – West Side (Beckey’s CAG guidebook) and the Chockstone Route (in honor of a 15 foot chockstone wedged in the chimney on pitch 5), this impressive line on Prusik’s 600-foot south face was first climbed by Stanley-Burgner duo in 1968. According to Nelson and Potterfield guidebook, this line passes over some of the most clean and solid granite found anywhere in the North Cascades. According to Gary Clark, the line is a “candidate” for the (modernized) North American Classics list. Indeed the line follows mostly solid rock and the climbing is varied and memorable. However, despite its appearance from your basecamp at Vivian Lake, it lacks the feeling of exposure. Many pitches begin and end on large, comfy ledges.Note that this is one of two popular south face routes, the other being South Face, Beckey line as described by Derek. Roughly speaking, the two share the same first pitch and then Beckey veers more rightward topping out on the ridge just east (right) of the summit block. Stanley-Burgner stays left of Beckey and tops out via a dihedral/crack system in the center of the summit block’s south face.
Getting There
Follow the hiking directions given on both the main Prusik Peak page as well as on the South Face, Beckey page. Note that this photo nicely shows the start of pitch 1 – both chimney and the 5.8 OW crack (first crack immediately left of the climber in the chimney). At the time we climbed this route, there was a huge rock cairn at the base. If you’re visually scouting the route from down below on the approach, look directly down from the obvious chockstone (400 feet up the face) and slightly left/west for the start.Route Description
Pitch 1: 5.8, 110 feet. This pitch is shared with South Face, Beckey line as described by Derek. Climb either the chimney or the 5.8 wide crack 6 feet left of the chimney. If climbing the wide crack, continue up this 5.8 OW till a groove with crack opens up on the right about 90 feet up. Climb up the groove to a good stance by the first large tree.Pitch 2: low 5th class, 70 feet. Move up (and slightly left) the low angle groove in direction of the highest large (~20 foot tall) tree. Follow line of least resistance. Belay at tree. Note that pitches 1 and 2 can be easily combined with a 60 meter rope.
Pitch 3: 5.8, 100 feet. Move directly up the thin crack from belay for about 15-20 feet and traverse right on good knobs. Continue traversing up and right (occasional pro but mostly easy) till you enter a high angle gully. Climb up gully and belay where convenient (many decent stances; one or two has rap slings).
Pitch 4: 5.8, 70 feet. Climb up gully passing a short bulge with two cracks in it. Belay on a small stance about 40 feet below the chockstone (note the rap slings on the block). Note that pitches 3 and 4 can be easily combined with a 60 meter rope.
Pitch 5: 5.8, 50 feet. Climb up the gully which now turns into a chimney to a sloping large ledge (old belay bolts) directly below chockstone. Tunnel behind the chockstone (not that tight but you’ll have to haul packs if you brought them). Belay on a large stance above and behind the chockstone.
Pitch 6: 5.9, 70 feet. Climb up the crack on the right aiming for the base of the flaring squeeze chimney. Enter chimney and make your way up it (2 pitons + good gear). Belay on the left side of the huge ledge directly above the chimney. Note that Nelson and Potterfield combine pitches 5 and 6 described here but you’ll miss out on the opportunity of taking pictures of your second squeezing through. Here's a cool photo showing the flare of the chimney.
Pitch 7: 5.9+, 140 feet. Move belay to the right side of the huge ledge directly below the dihedral. Climb up the dihedral (no crack initially) fighting through some wide sections. Above the bulge with two cracks on either side, the crack peters out and you stem your way up on knobs. Finger crack on right (and an OW) reappear higher and bring you to the base of the 2-inch crack. 20 feet of this 2-inch crack put you on the summit. This pitch looks more aesthetic (and shorter!) from the ground than it really is.
Descent:
Rap down north face with double ropes. You can either start by using a bolted rap station (old bolts) or slung chockstones inside a chimney on the summit. We’ve visited the summit twice and have rapped two different lines. Either way, two more double rope raps (after the summit rap) should get you to the 3rd class ledges/scree running along the base of north face of Prusik.
Hike west aiming for a notch (next to the balancing boulder) above Prusik Pass. Scramble down the south side via class 3 scree pile heading west then eventually cutting back south and east. Shortly you’ll arrive at the base of the route.
Topo
External Links
(1) Great TR from www.ericandlucie.com.(2) Great topo can be found here.


