|
|
Route |
|---|---|
|
|
40.39062°N / 111.64813°W |
|
|
Mountaineering |
|
|
Spring, Winter |
|
|
A long day |
|
|
Steep Snow (46 degree max) |
|
|
Overview
Battle Creek North Fork is a mountaineering route directly up the west face of Mount Timpanogos. The route covers 6,549 vertical feet in 4.8 miles. I've descended this route in snowless conditions and I can say it would be a dangerous, miserable, loose-scree climb. As a result, I've listed this route as a spring or winter snow climb. Personally I feel more comfortable with spring conditions because of the snow stability, but in the Utah Mountaineering Guide (by Michael Kelsey) this route is noted as a full winter route. When traveling in snow conditions (especially winter), only attempt this route with skilled awareness and understanding of avalanches and snow conditions. The west face would be totally unsurvivable in the event of an avalanche.
Getting There
To arrive at the trailhead to Battle Creek Canyon, take I-15 south from Salt Lake City to the Pleasant Grove exit (#275). Turn right onto Pleasant Grove Blvd and continue on that road until you hit State Street. Take a right onto State Street and continue until you hit 200 South. Turn left onto 200 South and continue east on that road until you come to the Pleasant Grove Water Tank. The road will transition to a dirt road and travel around the water tank. On the east side of the water tank is a parking lot and a Kiwanis Park.From the parking lot, there is a 4WD road that travels up Battle Creek Canyon. Hike this 4WD road and it will transition into a single trail in about .25 miles. Follow this trail up Battle Creek Canyon.
Route Description
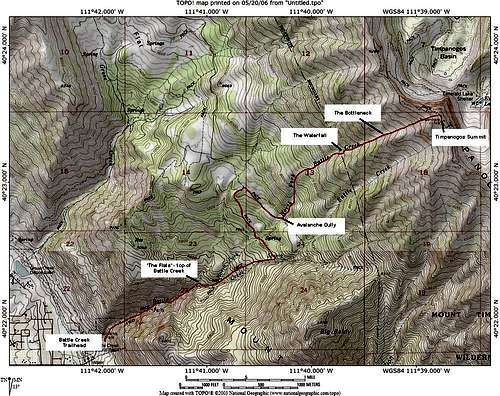
The following subheadings coincide with the labels on the route photo and topo map.
Battle Creek Trail

Once you're on the Battle Creek Trail, the trail is an easy 2 miles to 'The Flats'--the top of Battle Creek Canyon. While in the canyon you'll pass the Battle Creek Falls which is an impressive set of twin waterfalls roaring down the canyon.
The Flats

Arriving at 'The Flats' you'll notice the steep, cliff-lined walls of Battle Creek Canyon disappear into rolling foothills and meadows at the base of Timpanogos's west face. The reason I've noted this area is that there are many excellent areas to camp near running water. This route is a serious distance to go in one day, so some might find it more enjoyable to break the trip into 1-1/2 days and use 'The Flats' to camp.
From this point, the trail meanders through the foothills, then intersects with a trail that travels directly southeast toward Big Baldy. Follow the trail southeast toward Big Baldy. While traveling southeast, the first stream you cross is flowing from Battle Creek North Fork. This stream is descending through a steep avalanche gully which acts as the gateway to the west face.
Avalanche Gully

As the trail crosses the stream, break from the trail and head up the avalanche gully. The gully is steep and narrow with one small waterfall which is easily avoided. Right around this waterfall, watch out for snakes! There are snake holes in the limestone and dirt around the waterfalls. As we hiked this section, around 4am, I came around a boulder and my headlamp found a fat 'ol snake coiled in the corner. You can imagine I nearly wet myself with fright, and my retreat was so fast I have no idea what type of snake it was. We contined by going way around the waterall and didn't see any other snakes. Continue up the gully until you come to a roaring waterfall descending over a 100 foot section of cliffs.
It's important to note that during the winter, or times of questionable snow stability, I would not travel up the avalanche gully. We used the gully to avoid bushwacking in the spring, but during the winter I would travel through the forests of the foothills to reach the 100 foot waterfall. I guess you could say that under questionable snow conditions you have no business in this area anyway, so traveling the gully is okay, but I must say that at 4am, during perfectly-stable spring snow, this gully was very eerie. Mountain goat bones were littered around and the gully walls are 60-100 feet tall.

The Waterfall

Although you will pass many waterfalls on the way up this route, I'll mention this one in particular because it's a major obsticle. You can bypass this section of cliffs on the left or right. I have traveled both sides and I think the right side is more efficient. It has less bushwacking and holds snow longer for easier travel. This is the first steep section of the route. The slope's max is 43 degrees as you come around the waterfall. At the top of the waterfall the slope eases to about 34 degrees. From here, the route is a simple straight-shot up the west face.
The Bottleneck

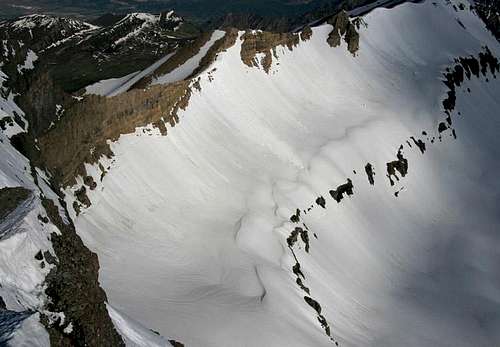
Traveling up the west face above the major waterfall, referred to above, the snow is a moderate average of 35 degrees. The surroundings are calm and beautiful. During the spring, there is a stark contrast between the surrounding snow and cliffs, and the soft green of the foothills below. It's just awesome.
Above 'The Waterfall', there are several small cliff bands that bisect the west face. During our trip, all of them were covered with snow except for the largest, which I've labeled 'The Bottleneck'. 'The Bottleneck' is a steep (45 degrees) ribbon of snow that travels up the cliff band. It is worth mentioning because the ribbon of snow is really a snowbridge connecting the the main snow field and the top of the cliffs. Between the two there was a deep moat (about 3 feet wide and 12 feet deep) between the snow field and the cliff. During times of additional snow, I'm sure this whole area is covered. But as the snow begins to thin, you'll want to watch out for this area and travel safely.

Upon descent, we glissaded down the west face and lost control at this section. The snow was very steep and much more icy than the terrain above us that we had just slid down. So we miscalculated our speed, lost control, and flew right over the cliffs at 'The Bottleneck'. The fall was small and was not in anyway a planned event. Rather it was a stupid lack a attention and luckily no one was hurt.
The Summit

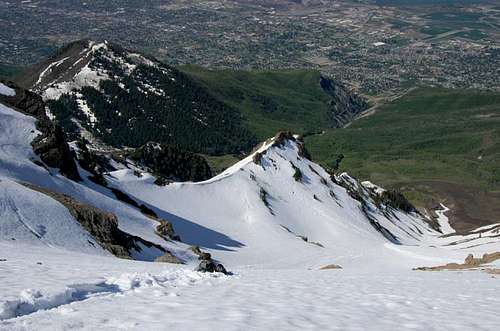
Above 'The Bottleneck', the slope will return to an average of 35 degrees until the final 900 vertical feet. At the final 900 vertical feet, the slope will return to steep snow. If you head left up the face you can shorten the distance and catch the summit ridge a little earlier, the sloped looked around 45 degrees. We traveled straight up the middle and the slope was 44-46 degrees. If you want more of the challenge, you can head right to where the slope looked to be in the mid-50s. Either way, this was the best part of the route with the most amazing views. If you are anxious on steep snow, you might consider a rope with snow pickets at this point. If you loose your footing and slip, you will go a long, long way down.
After all this, you're at the top! The views are stunning. Much better than summer views because the deep snow adds a neat alpine feeling.
Stats and Travel Times
Battle Creek Trailhead to The FlatsDistance: 1.5 mi.
Elevation Increase +1,400'
The Flats to the Avalanche Gully
Distance: 1.6 mi.
Elevation Increase +800'
Avalanche Gully to The Summit
Distance: 1.7 mi.
Elevation Increase +4,349'
We are probably considered moderate in our travel speed. The following are our arrival times at each section:
-Trailhead at 1:00am
-The Flats at 2:30am
-Avalanche Gully at 3:30am
-Summit at 9:00am
-And the ride down took minutes! Gotta love the spring!
Essential Gear
Avalanche gear, axe, crampons, helmet (we didn't experience any rockfall but evidence of it is all around). Maybe a rope and snow pickets if the final 900 vertical feet make you a little anxious.External Links
View our mountain website for a Trip Report and 40+ photos.