
-
 10026 Hits
-
 71.06% Score
-
 1 Votes
|
|
Route |
|---|---|
|
|
40.61940°N / 111.7874°W |
|
|
Sport,Trad - Single Pitch |
|
|
Less than two hours |
|
|
5.8 - 5.11a |
|
|
Approach
Park at the turnouts 2.4 miles up the canyon from the neon sign or the Park N' Ride. The turnouts are just past JHCOB wall on the south side of the road.
If you look at the cliffs high above the scree slopes, you can pick out a large rock wall with a red oxidized stain on it - this is the Narcolepsy Area. A rough climbers trail heads into a grove of pine trees from the turnout.
While some may disagree, due to dead-fall and the VERY loose rock at the end of the climber's trail that stays in the trees, I'd recommend following the climbers trail that turns out from the grove of pines (heading east) and ascends the scree slope directly. This is still loose, and has a longer stretch of loose rock, but for me it still seemed to be less of a pain.
If you stay on the climbers trail, eventually it reaches the end of the pine grove and heads uphill, traversing along the base of the Narcolepsy area.
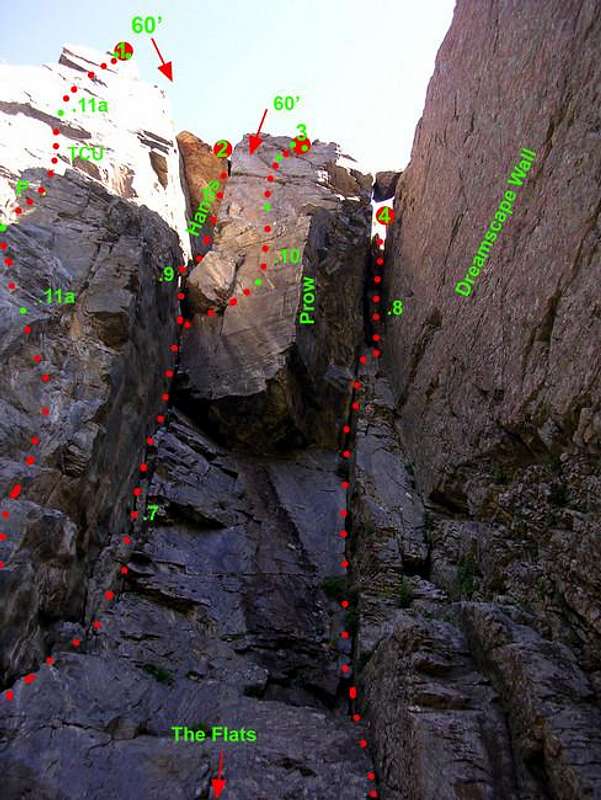
From here, there is a rock outcropping, with two prominent cracks splitting one large wall. This is the bottom of the Narcolepsy area, but most of the routes are found along the higher, shady, 100 ft wide wall. Just walk around the east (up canyon) side of the rock outcrops to reach the flat shady areas at the base of the wall.
Overall, one ascends some 150 ft over loose rock to reach the wall, which should take about 5-10 minutes.
 |  |  |
Route Description
Narcolepsy Wall is a great climbing area just a short ways above the loose slopes south of the Big Cottonwood Canyon road, just downhill from the Storm Mountain Picnic Ground. It is mostly hidden by pines, so it is hard to see from the road, but these pines keep the wall shady for most of the day.
The wall is vertical or slightly less than vertical and sports a number of quality face and crack climbs, all of which can be top-roped if desired. The rock is solid and clean, and the relative isolation of this crag keeps many of the evening crowds away.
| ||||||||||||||||||||||||||||||||||||||||||||||||||||||||||||||||||||||||||||||||||||||||||

Anchors and Walk Offs
Virtually all of the routes can be walked off, although many prefer to lower on the routes with bolted anchors.
To set up anchors for the lower outcropping, hike up to the base of Dreamscape Wall and double back north following a rock ridge that terminates in the wall. A gear anchor can be made here, and there is a SLCD left in one of the cracks.
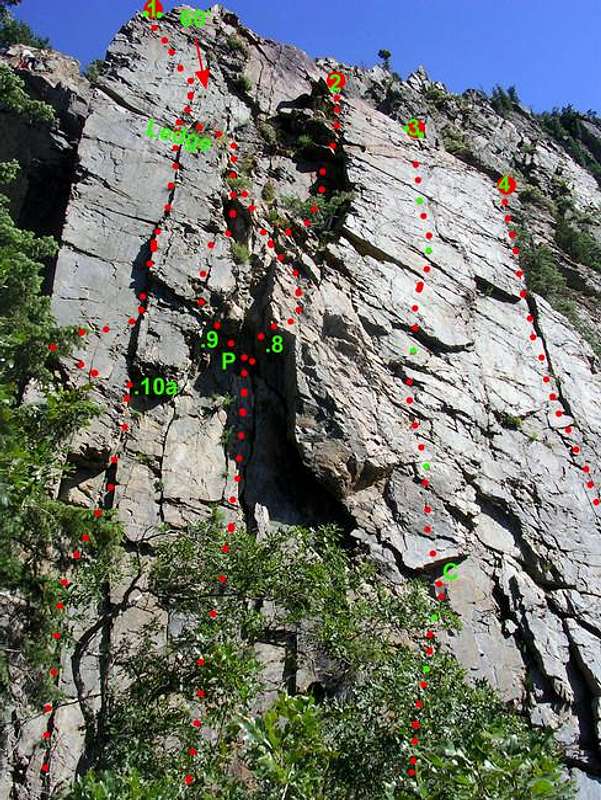
To set up anchors for the rest of the routes, follow a climber trail up and around to the left of the wall.This eventually doubles back on a ledge, which takes you to a large, sloping ledge atop the wall. It has some loose flakey rock, but it is easy to scramble down to reach the anchors.
The top of Narcosis is easy to locate because of the large chock-stone at the top. Walk around the left of this to reach a 5 ft wide ledge. From here there are bolts on the end that can be used for Suture Fancy and Involuntary Release. If you reach over the edge of the ledge, you can reach the bolts atop Dreamscape. The bolt anchors for Narcosis are inconveniently far below the ledge, and one should probably clip a sling into the bolts for Involuntary Release before downclimbing to these bolts. It is easier to downclimb partway down the arete and reach back over to the chains.
For the routes further to the right of Suture Fancy, the scrambling to reach the anchors is exposed and a fall could be fatal. This is especially the case for the bolts above Dream Slate. To minimize the hazard, the anchor setter can downclimb to these from the ledge atop Dreamscape Wall while on belay from the bolts on this ledge. I found it awkward to throw the rope down from these anchors and still return to the ledge atop Dreamscape Wall while on belay. DO NOT climb back up and throw the ropes from Dreamscape Wall - there are two large horns jutting out near the bolted anchors for Dream Slate that will snag your rope! Perhaps the best way to top rope these routes is to have two ropes, one to descend to the anchors on, and another to thread through the anchor and throw off.
Any route that ends on the main wall can be walked off via the way described for reaching the anchors.
Narcosis - 5.8
This is the large chimney between Dreamscape Wall and the Prow. It starts out as an easy crack climb (5.5), with a break in the middle before the chimney, topping out after 60 ft of climbing.
The chimney was fun, fast, and easy climbing, but I was a little disappointed - I had been expecting a more difficult squeeze chimney, but in fact, when the chimney gets tight, one merely needs to climb near the ouside edges and there face climbing moves allow you to bypass the more difficult chimney moves.
I didn't really see any places where pro can be placed in the chimney, although I wasn't looking terribly hard for placements as I was on top rope.
If top-roping this route, the anchor possibilities at the top are lousy (I slung two small horns, a bunch of bushes, and had a small nut in a crack directly more to the side than along the direction of pull) and the rope drag is high. The best option is to belay from above. Here you can do a braced belay behind a ledge a little below the top of the route, and sling yourself to a small tree for added security. The rope drag is minimal belaying from above. Also, the top has long, narrow cracks that will eat the rope - it is recommended that you place a scured backpack or rope bag across this gap to keep the rope out of it!
Descent: Lower or walk off (walk off is probably more pleasant)
Dreamscape - 5.9+
This route was really fun. The wall started steep with juggy holds, but as one climbs higher, a featureless bulge is approached. Climb to the left of this and traverse back over higher up on fingertip holds.
At the top of the bulge one must mantle a 2-6 inch wide flake, as there are no holds above it, and then tip-toe along the flake before the final climb to the top.
This wall is steep, the rock is bomber, and the bolts are widely spaced along this 60 ft route. The route ascends Dreamscape Wall, which stays shaded throughout the entire day. The bolted anchors can easily be reached from the large ledge above the wall (see Anchors and Walk Offs for details).
Narcolepsy - 5.8 R
This is a really fun sport climb ascending the right side of Dreamscape Wall near the arete. Climb up the steep rock - as it gets steeper hold disapper. Watch out for a loose flake. When upward progress becomes too difficult, step over to the arete and climb up it, occasionally working back onto the wall.
Involuntary Release - 5.10a
Involuntary Release ascends the first crack to the right of the Dreamscape Wall arete.
This is a great route requiring a mixture of crack and face climbing. The climb begins with a 20 ft finger crack, which is conducive to laybacking. This crack dead-ends into a roof, which is bypassed to the left by reaching across polished quartzite, laybacking on the arete of Dreamscape Wall, and then traversing back to the continuation of the crack above the roof on smooth squared finger-holds.
About 10 ft before the top a large ledge is reached. The final wall is a fun 5.9-5.10? climb, although it looks difficult to protect, so lead climbers beware falling onto the ledge!
This route can be top-roped a bolted anchor on top of a wide ledge above Dreamscape Wall (see Anchors and Walk Offs for details).
This route has thin cracks, so micro-nuts are key to protection on lead.
Suture Fancy - 5.8-5.9
Suture Fancy ascends the next crack to the right of Involuntary Release.
This route is fun and interesting, although it is also a little dirty and brushy. To be frank, I found the route and its rating confusing, which I will discuss below.
The route starts with a nice crack climb, but is interrupted by some unpleasant brush in the crack midway up. The Rock Climbing the Wasatch Range's topo shows this section as being 5.9, but I'd say it is more like 5.7 to 5.8. The crack turns into a notch cutting through a roof, and this is where the confusion begins.
The notch itself looks unpleasant, being small enough to get a climber stuck. You can ascend some smaller cracks a couple of feet to the left over the roof (5.9), or you can climb out of the notch onto an overhanging face (5.8) a couple of feet to the right. As the routes on either side of this one are 5.10a, neither variation could be ascending an easier route, so I can only assume that either one is 'legal' for staying on route.
Above the roof is a large ledge covered in talus with a bit of brush. The route topo shows the route ascending this ledge to the right, with a little more climbing before reaching the top (which is very easy and burshy), where a gear anchor can be made or you can clip into the chains for Dream Slate. I top-roped this route from the bolts for Involuntary Release, and it is nicer and more direct to climb to the left, reaching the large ledge and final 5.9-5.10? headwall below the bolted anchors.
Turn of the Sentry - 5.8
This is the rightmost route on the north west wall of the Narcolepsy Area. Ascend wide cracks between the wall and some large, disconnected blocks. Climb along a large crack, with some face climbing moves. It is helpful to shove your leg in the crack for climbing. At the top of the crack, traverse to the right to a pair of finger cracks. Ascend these up a smooth face to a ledge. From here climb around the backside of a wall to your left to reach the sloping rock ramps where you can make a gear anchor. This route can also be top roped from the chains for Dream Slate. Descent: Lower or walk off if you don't mind lethal exposure.
Anuresis - 5.9
Coming Soon
Don't Jump Back Crack - 5.9+
Coming Soon . . .
Solitary Confinement - 5.9+
Coming Soon . . .
Essential Gear
Essential gear should be described on a route by route basis. In general, all of these routes can be top-roped, although a number of the routes require trad anchors. While the rock at the base of the wall is somewhat loose, it is clean higher up, so helmets are probably not needed unless you're leading.
Other Info
If you have additional info for routes described or have done a route not described in depth, please put the info here and I'll integrate it into the page!