Although several trip reports exist on Summit Post covering mountaineering in Bolivia, there is a lack of up-to-date information regarding gear and guide services available in La Paz. I am writing this trip report in order to fill that gap, and to expand the internet based resources regarding mountaineering in Bolivia. Additionally, I hope that our mountaineering experience and the climbing schedule that we used will be helpful to other climbers planning trips to the Bolivian Andes.
Goal & Schedule of Our Trip
The goal of our trip was to summit peaks in the Bolivian Andes that are más o menos 5,500 meters, 6,000 meters and 6,500 meters in height. My climbing partner Tom and I allotted 16 days for this goal. We did all of our planning and logistics in-country and set up the following schedule within the first 48 hours in La Paz:
3 days acclimatization, trip planning, and tourism in and around La Paz (3,600 meters)
1 day acclimatization drive and hike up Chacaltaya Mountain (5,400 meters)
3 days acclimatization and hiking from Q'ara Quta Lake to Condoriri base camp (3,800 - 5,200 meters)
1 day acclimatization hike up Pico Austria from Condoriri base camp (5,300 meters)
1 day climb up Pequeño Alpamayo from Condoriri base camp (5,370 meters)
3 day climb up Huayna Potosí (6,088 meters)
1 rest day in La Paz (3,600 meters)
3 day climb on Sajamá (the country high point at 6,543 meters)
Arriving in Bolivia
Flying into Bolivia is a shock to the system. The simple act of getting off a plane at world's highest international airport (13,500 feet above sea level) leaves many passengers gasping for air. Additionally, the only flights that arrive from the US land just before sunrise. It was the first of many times on the trip that I would be shaken awake by some unknown Bolivian saying: "Ya hemos llegado, hombre" (We have arrived... man). The lack of oxygen combined with the early morning wake-up call was enough to completely disorient the majority of the passengers. If being forced to pay $135 just to enter the country wasn't enough of a wake-up call, the stunning drive down into the valley-shaped city center of La Paz certainly was. We had our driver stop as the sun rose, lighting up the brick homes belonging to El Alto and La Paz's 1.6 million inhabitants.
As soon as we arrived in La Paz, we jumped in a cab and headed to Sagarnaga Street (cost: 50 Bolivianos), the main drag for trekking, biking, and mountaineering outfitters in La Paz. We spent our first 3 days "Caminando despacio, tomando poquito, y durmiendo solito".
The markets were fun to visit during our first few days in the city.
Throughout our time in La Paz we stayed in Hostal Naira which had an amazing free breakfast, very clean rooms, a perfect location, and an incredibly friendly staff. The cost was 230 Bolivianos for 2 people per night.
Gear & Guide Shops in La Paz
The three blocks of Sagarnaga Street around Hostal Naira are littered with tour agencies, climbing shops, and restaurants. It is important to understand that the wealth of mountaineering outfitters, gear shops, and guides around Sagarnaga Street makes planning climbing trips in Bolivia extremely easy. Additionally, the height of the Bolivian Andes necessitates a few days of acclimatization, and La Paz' height (3,600 meters) makes it the perfect location to hang out before your climbs.
Tom and I decided to use a guide, cook, and mules throughout our time climbing in Bolivia. While we brought all of our own gear (with the exception of a tent and plastic boots) in the end we realized this was pretty pointless as there were several outfitters on Sagarnaga that had a wide variety of good climbing gear. I wear a size 13 1/2 shoe and found good (not great, but very useable) plastic boots at all three of the outfitters that I inspected. I am glad that I brought my own ice axe, crampons, and water purification pills, but everything else could have been rented in La Paz. Also, if you are paying for guide, it DOES NOT COST ANYTHING extra to use the associated outfitter's gear.
In the end, we organized our climbs through two different guide services and spoke at length with 4 others. That said -- and I know this sounds obvious -- if using a guide for your climbing, make sure they are professionally accredited. A big issue in the La Paz climbing scene is non-accredited guides undercutting the prices of accredited guides, stealing their clients and providing unsafe and substandard services. All accredited guides go through a rigorous UIAGM training. While it is far cheaper to plan things in country, you could guarantee an accredited guide by organizing the trip through a UIAGM guide. All accredited guides, including their contact information can be found here
We organized the first 8 days of our expedition through Adolfo Andino -- one of the main outfitters on Sagarnaga. I DO NOT recommend using his services as he did not follow through on many of his promises (changed our guide, sent us an uncertified guide, did not sent adequate food, etc). The second part of our trip (Sajamá) was done with Eduardo Mamani Quispe of Bolivian Mountain Guides. Eduardo was an excellent guide, hilarious person, and great trip leader. He rented us good, quality gear including a new north face 4-season tent, good plastic boots, and good climbing pro. Additionally, he went out of his way to make sure we had the food we wanted. Eduardo speaks a bit of English, but if you need to write emails in English, speak to his secretary: Miriam Centellas. Here is his contact information.
His telephone numbers: Mobile: +591 75263820, Office: +591 77580433
Email: eduardo@bolivianmountainguides.com http://www.bolivianmountainguides.com/
Address in La Paz: Av.Circunvalación #327, Alto Villa Victoria
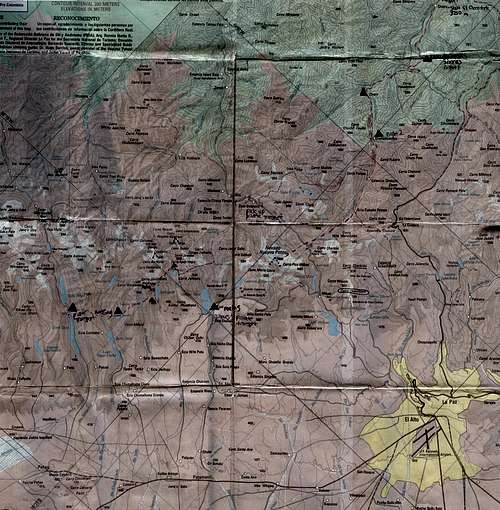
This map shows a section of Bolivia's Cordillera Real.
The urban area of La Paz is visible in the lower-right hand corner of the map (shown in yellow). You can also clearly see the camps that we used during our trek (purple triangles) as well as the mountains we climbed (purple dots forming an upward pointing arrow). The pink dotted line is a very rough representation of the trail, which in actuality follows the contour lines a lot more closely. Don't let the proximity of these peaks to La Paz fool you, once you leave the yellow area of La Paz, all the roads are dirt. Notice the hand written note that says that it took us 2 1/2 hour to get from Tuni to La Paz in private transport.
This map also shows the camps that are commonly used for the Choro Trek, a popular 2-5 day trek close to La Paz. Look for the hand written note that says "start of the Choro Trek" in the upper-right hand corner of the map. While this camp is typically the end of the Choro Trek, doing the trek in reverse would serve as great acclimatization before heading into bigger mountains.
The scale of this map is 1:135,000. It is only intended as a rough guide to the area, not a detailed hiking or climbing map.
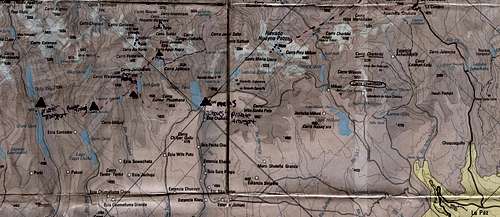
I have also uploaded a cropped version of this map -- see below -- showing only the hiking and climbing around the Condoriri Base Camp.
A cropped version of the above map.
In The Mountains -- Trekking and Pequeño Alpamayo
In order to continue the acclimatization that we had been doing in La Paz, we set out on a lame day trip to Chacaltaya Mountain (5,400 meters, see topo map)
Here is a short clip taken from the summit of Chacaltaya showing the range we would be spending the next week in.
On the following morning we met our cook and trekking guide and set out for Q'ara Quta Lake. Once we reached the lake, we set up a camp and met our arriero (muleteer). Although it was extremely difficult to reach (see video below) the camp was in a wild, beautiful alpine valley, and even included a fairly well constructed toilet.
A short video showing the last obstacle on the way to our first camp.
If you visit, it is important to bring small bills to pay local co-ops for camping while you will be trekking. The next day we hiked east, following a trail up a ridge, down into another beautiful valley, and up onto a plateau. That night we camped at Laguna Ajwañi. On the third day we hiked to the Condoriri Base Camp. The elevation throughout the three days varied between 3,800 - 5,200 meters. While the Condoriri Base Camp can be reached in a day from La Paz, we wanted to use the additional time for further acclimatization. If you want to do this hike on your own, it is outlined in Yossi Brain's book Trekking in Bolivia: A Traveler's Guide.
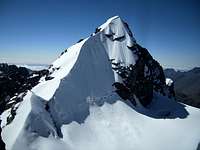
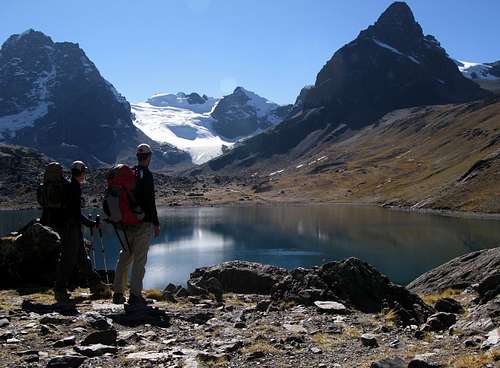
The photo shows Felix, our cook and trekking guide pointing out the Condoriri base camp, where we would be spending the next three days. The glacier-clad peak above the lake is Pequeño Alpamayo, our first major objective. Feel free to view this version of the photo on FLICKR where you can follow an interactive tour of Pequeño Alpamayo from different angles. Tom is sporting the Musical Backpack, which gave us some extra hiking energy during the longer pushes!
On the next day, we hiked up Pico Austria with our cook for the final phase of our acclimatization before hitting the snow.
This is a minute long clip showing the mountains surrounding the Condoriri Base Camp. It was taken from the summit of Pico Austria.
The climb up Pequeño Alpamayo is well outlined in various other Summit Post pages. I will say that we decided to "sleep in" on summit day until 4:00 AM. If you are well acclimatized and the weather is good (which it will be in June, July, or August) this is a reasonable wake-up time. We arrived back at the base camp around 4:00 PM. The climb is composed of two sections: Section 1) The hike to the glacier and the climb up the very gentle glacier to the summit of Cerro Tarija. This is the spot where all of the famous Pequeño Alpamayo photos are taken. The light is best in second half of the day.
Here is a 16 second clip that shows what the hike up the glacier is like. The clip includes footage of a couple of crevasses.
Here is a 40 second video of the Cerro Tarija block on Pequeno Alpamayo and the subsequent ridge line.
Section 2) The rocky 300-foot down climb off the summit block of Cerro Tarija and the steeper glacier and packed snow climb to the summit of Pequeño Alpamayo. The second section of the climb is on a beautifully aesthetic ridge-line with amazing views and great exposure -- climbing heaven!
Here is a 22 second video clip from the steepest part of the climb.
The following photos give an idea of the size and gradient of the glacier leading up to Tarija and the climb up the final ridge.
We spent that night in the Condoriri base camp. The following morning we hiked two hours down-valley (South) to Tuni Village and met a vehicle for the ride to the Huayna Potosí base camp. It is worth mentioning that you could trek to Huayna Potosí camp from the Condoriri Base Camp. That said, our trekking and climbing, including food, guides, mules, and transportation only cost $30 per person per day! Looking back, we would have gladly paid far more for better food and service.
The Condoriri base camp was a perfect place to begin our mountaineering excursion. The entire basin was amazing -- studded with alpine lakes hovering around 4,000 meters and guarded by several 5,000 and 6,000 meter peaks. Not a bad way to spend a few days.
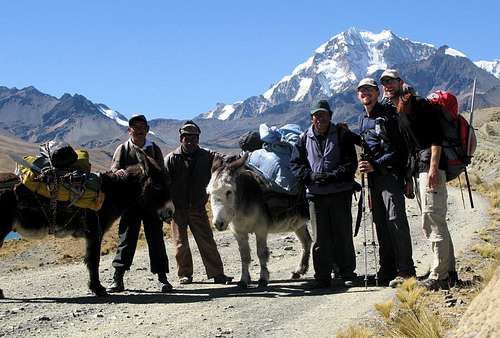
A panorama of the group that made our climbing in the Cordillera Real possible. Out next objective, Huayna Potosí looms in the background.
Huayna Potosí
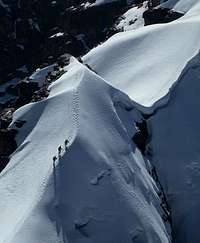
Huayna Potosí is an over-climbed, crowded peak. Its popularity is due to its proximity to La Paz, its incredible publicity, and its reputation for being one of the easiest climbs up a 6,000 meter peak anywhere in the world.
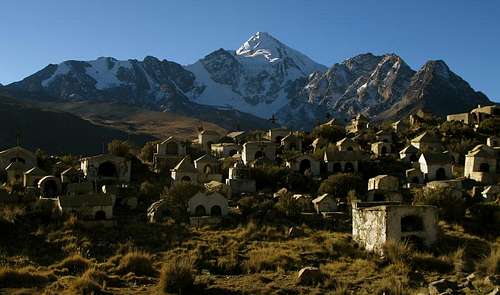
Huayna Potosí overshadows this graveyard on the way to base camp.
While it is not a difficult peak, the number of climbers on the mountain often present a dangerous climbing situation. On one occasion, a guide (from the Huayna Potosí guide service) purposefully kicked a pile of rocks down a chute that was less than 5 feet away from us. When we asked why he did it, he simply shrugged his shoulders. The situation on summit day is similar to Kilimanjaro: the guides know that they will get tipped better if they get their clients to the top, so guides literally drag clients to the summit. We passed several parties that should have turned around but were convinced to continue by ego-driven guides. As you can see from the summit ridge it is no place you want to be with 30 inexperienced and exhausted climbers. Additionally, the guides have a real group mentality, which took a lot of the fun away from our climbing experience. Specifically, at the high camp all of the guides decided to get up at 2:00 AM and leave by 3:00 on summit day. Tom and I had calculated the elevation we needed to climb, as well as the amount of time it would take us to do so, and told the guide we wanted to get up at 4:00 AM. While he knew -- having just finished climbing Pequeño Alpamayo with us -- that we were fit enough to do the climb in that amount of time, for some reason made us get up with the group at 2:00 AM. It was a terrible decision that resulted in us arriving at the summit 45 minutes before the sun rose. Suffice to say that it was a painfully cold and windy 45 minutes (although in hindsight it was good preparation for Sajama). This poor decision was the final straw with Adolfo Andino's company. I decided then and there that I would be climbing Sajama with another company.
While we were happy to gain further acclimatization before heading to Sajama, the best part about the 3-day climb was hanging out with other climbers (er... I mean hikers) from all over the world. Additionally the mountain has great, well-constructed lodges at the base camp and high camp. These lodges only lack adequate bathroom facilities. All-in-all we were glad we did Huayna Potosí, but I wouldn't recommend it for any serious climbers.
Looking back, we would have preferred staying at the Condoriri Base Camp and climbing the Cabeza Del Condor.
We had planned our entire Bolivian trekking and mountaineering trip in order to give us a better chance at reaching Bolivia's High Point: Nevado Sajama. Thanks to a good acclimatization schedule, we had spent the previous 8 days above 4,000 meters and the previous 12 days above 3,600. We were feeling great, especially after our rest day in La Paz (and by rest I mean eating, eating, and more eating!)
As mentioned earlier, we climbed Sajama with Eduardo from Bolivian Mountains. The Sajama page has good descriptions of the climb, so I will just fill in some trip specific details.
While planning for Sajama, I had a hard time getting any useful information about the actual climb. I asked several people in La Paz the same questions: "How steep is the glacier?" "What pro do we need?" "How far is the hike to base camp?" But was always met with the same response: "Hay mucho frío en Sjama" "El viento y el frío en Sajama son horrible" "Que FRÍO hombre, Sajama no solo tiene frío, pero tiene AIRE!!!" One thing was clear: it was going to be very cold and windy on Sajama. That said, I figured that the actual climb wasn't going to be extremely technical.
Once we met with Eduardo, he described the route in further detail. The drive to the town of Sajama took us around 5 hours from La Paz. From there, we paid the park entrance fee, found mules and arrieros for the hike in to base camp, and porters for the climb up to high camp.
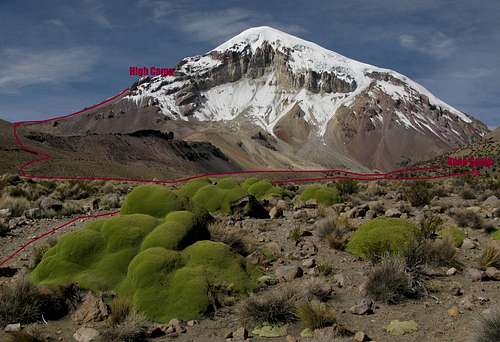
This photo clearly shows the route from the base camp to the high camp of Sajama. One could easily make the trip from the town of Sajama to the high camp in one day -- or from the base camp to the summit in one day -- if the altitudes weren't so extreme. The base camp is a 30-minutes walk from this shot (on similar terrain), and the high camp is located just under the... parallelogram-shaped (thanks, Tom!) rock on the ridge-line.
The following photos and their descriptions briefly outline our experience climbing Nevado Sajama. I posted them in order of the obstacles that you encounter during the climb.
Here is a shot from the windswept town of Sajama, where you begin the hike to Bolivia's highest point. Although we headed directly for base camp, there are ample rustic accommodation options (read: dirty) in town if you arrive too late to hike in to base camp.
This photo shows the twins (Parinacota and Pomerata) from the town of Sajama. The twins, which form the border between Chile and Bolivia, are clearly visible during most of the Sajama climb.
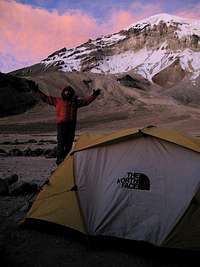
Tom is obviously excited to get away from the cold of base camp and move into the extreme cold of high camp. Our nerves kept us awake for most of the night -- would is be too windy to climb, would we be strong enough to summit? Three other groups of climbers descended Sajama that day, all unsuccessful on their summit attempts.
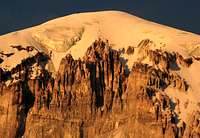
Sunset bathes Sajama's dome shaped summit in a deep orange glow. The large dome at the top of Sajama has even seen a soccer game on the summit! Read about it here.
This photo shows one of the only suitable locations to set up a high camp on Nevado Sajama. At 5,620 meters, the camp has three good locations for medium sized mountaineering tents and a couple of other locations suitable for small tents. The snowline is just out of the photo (behind the photographer to the right), so 'water' is only a few steps away.
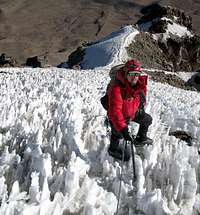
The next morning we woke up at 2:00 AM, donned crampons, and hit the glacier. We roped up for the first obstacle, which is a relatively steep wall (no photos, sorry). This photo shows the gentle grade on the Sajama Glacier above the wall. It was all fun and games until we got to the penitentes!
The method for traveling over the penitentes involved breaking off the tops of the penitentes with an ice axe and then bridging two of remaining ice blades with each foot, carefully transferring your weight forward. It was a tedious, time-consuming task made all the more difficult by the altitude. The Twins -- Parinacota and Pomerata -- hover in the background. Wikipedia has an interesting article on the formation of the penitentes if anyone is so inclined: www.wikipedia.org/wiki/Penitentes
Tom traveling through the penitentes. I like this photo because if gives you a good idea of the grade of the glacier and the distance you have to travel through the penitentes.
A close-up of the penitentes on Nevado Sajama. This photo also shows the gradient of the glacier.
There is a bit of mixed climbing on the normal route up Sajama. This photo shows the majority of the moves you have to do on rock. Pretty straight forward, but arduous in crampons and high-altitude gear. There are plenty of rock protrusions (horns, crack, etc) to "enganchar" the rope in case of a fall.
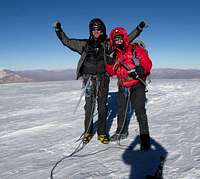
Tom and I reached the summit of Nevado Sajama a few hours after the sun rose on June 26th, 2009. Although it was my eighth successful country high point, Sajama was by far the highest, coldest, and windiest place I had ever been. I have no idea how cold it was during the climb, but suffice to say that Tom put a nalgene water bottle under two thick jackets before heading out for the summit, and by the time we reached the top of the peak it was frozen. Additionally, I developed a slight case of frostnip on one of my fingers during the descent -- for the following month it acted as a constant reminder of our human vulnerability.
Here is a 55 second video we took on the summit of Nevado Sajama. As you can see, we are all utterly exhausted. Not sure if you can hear me say "I don't even have the breath to say anything." The wind was intense -- you can barely make out what our guide is saying over the howling wind.
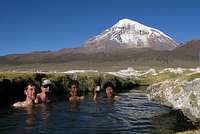
On the same day that we reached the summit of Sajama, we found ourselves relaxing in the hot springs at the base of the mountain. It was a temperature swing of over 100 degrees Fahrenheit in under six hours, and it felt great! We returned to La Paz that same evening, spending a night in a comfy bed before heading down to the Bolivian Amazin for another two weeks of adventure.
Maps
A New Map of The Cordillera Real de Los Andes (for a general overview of the main range we climbed in) scale 1:135,000. This map is available at various outfitters on Sagarnaga Street in La Paz.
More useful 1:50,000 scale maps are available at the Instituto Geográfico Nacional (IGN) in La Paz. There are two IGN offices in the city: one in the Miraflores district on Av. Saavedra 2303, Estado Mayor General Casilla 7641. The other is located in Oficina 5, Juan XXIII 100. Both IGN locations are shown on the map in the Lonely Planet, Bolivia
Drugs
Diamox - Acetazolamide (Acetazolamida in Spanish). We took 125 mg (1/2 a pill) twice daily once we began the high altitude trek through the summit of Sajama.
Final Thoughts
Feel free to contact me -- WhereInTheWorldIsBryan at gmail dot com -- with any questions about traveling, hiking, and climbing in Bolivia. The country has a ton to offer, is cheap, and doesn't see many Americans. In total we spent 6 weeks in Bolivia before moving on to Peru. Happy climbing!
"One final paragraph of advice: Do not burn yourself out. Be as I am -- a reluctant enthusiast... a part time crusader, a half-hearted fanatic. Save the other half of yourselves and your lives for pleasure and adventure. It is not enough to fight for the land; it is even more important to enjoy it. While you can. While it is still there. So get out there and mess around with your friends, ramble out yonder and explore the forests, encounter the grizz, climb the mountains. Run the rivers, breathe deep of that yet sweet and lucid air, sit quietly for a while and contemplate the precious stillness, that lovely, mysterious and awesome space. Enjoy yourselves, keep your brain in your head and your head firmly attached to your body, the body active and alive, and I promise you this much: I promise you this one sweet victory over our enemies, over those deskbound people with their hearts in a safe deposit box and their eyes hypnotized by desk calculators. I promise you this: you will outlive the bastards." -Edward Abbey
Thanks for the compliment! Yeah our total trip was about two months, which gave plenty of time for cultural travel, jungle exploring, hiking, and mountaineering. I really look forward to going back to Peru for some climbing, hopefully next year!
Thanks for your positive comment. Regarding Peru, unfortunately we didn't get to do any mountaineering. We were planning a couple of peaks around Arrequipa, but then we realized that both my climbing partner and I had a Human Bot Fly in our shoulders (which we got in the Amazon). As opposed to climbing, we ended up going to the doctor, getting surgery, etc. The whole ordeal was a pain in the ass. In the end it probably worked out for the best as there was a huge storm the next week -- it shut down all the major passes for a couple of days. Wouldn't have enjoyed being at 20,000 feet with that weather.
A well written report. I like your html work for the photo matrix. I might have to use that. Your trip brought back fond memories of my time there in 2008. Cheers!
hey...Great Trip Report!!! it brought back great memories for me as i was in SA for a few months last winter, and also climbed Alpamayo and Potosi while in Bolivia- both spectacular!! unfortunately i had the same dark summit experience on Potosi.
but loved everything- Bolivia rocks.
I briefly mentioned in the trip report that we used two different guide services. We had a bad experience with the first one and an amazing experience with the second one.
The guide we liked was Eduardo Mamani (his contact details are all in the trip report). To say that he made the trip easier is a huge understatement. The biggest hassle in Bolivia is transportation, as the vast majority of peaks require 4X4 private transport. Eduardo had his own vehicles and knows all of the back roads, so that was a snap. Furthermore, he knows porters, cooks, and arrieros all over the country. Not only did he organize booking them, but he got a price that was substantially less than what we would have paid on our own. Also, while we could have climbed all the peak on our own, having someone who knew the route was great. Finally, he is a hilarious guy. He really made the climbing fun and made sure that we were having a good time. When you price everything out, the extra money you pay organizing your own food, transport, mules, etc is barely worth going without a guide. At least for Bolivia, I highly recommend it!
I am planning to do the same itinerary as yours but not having too much luck with dates and groups. I am the only one so far who is signed up for fixed departure dates from bolivianmountains. I am little worried about the guides and all.
It is easy to organize the logistics on the ground. There are tons of guides there and all of the guide shops are located on the same street. It would save you a lot of money (but cost another day or two) to organize it on the ground.
Parents refers to a larger category under which an object falls. For example, theAconcagua mountain page has the 'Aconcagua Group' and the 'Seven Summits' asparents and is a parent itself to many routes, photos, and Trip Reports.


Comments
Post a Comment