Trip: Rugged Mountain-Vancouver Island - New Route up North-West Face
Date: 1/5/2014
Trip Report:
Trip: Rugged Mt. Winter Ascent
Date: Jan 3-Jan 5/2014
Rugged Mt. Vancouver Island
Hunter Lee, Henrik Hinkkala
Trip Report:
After two years of waiting for the right weather window, the right temperatures and time available to climb, the stars aligned and Henrik and I found ourselves driving towards Zebellos in the wee hours of the morning hoping conditions would allow us to climb Rugged Mt. by its North-West Face. After failing in an attempt to climb Rugged in the Winter of 2010, we knew cold temperatures where the key to a successful climb. We had trepidation regarding the climbing conditions, as the Winter season has thus far been rather dry. Limited snow fall meant our ice line might end up being a mixed climb, or even a rock line in parts.
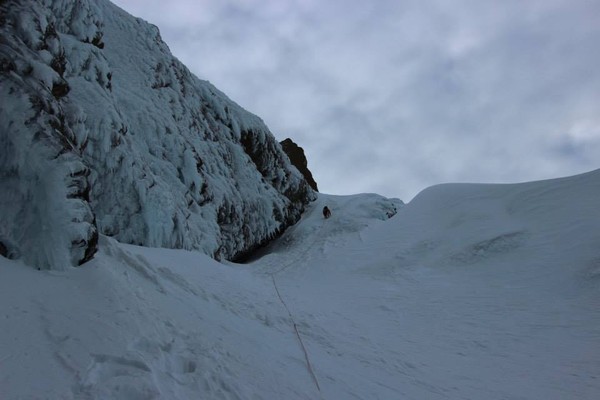
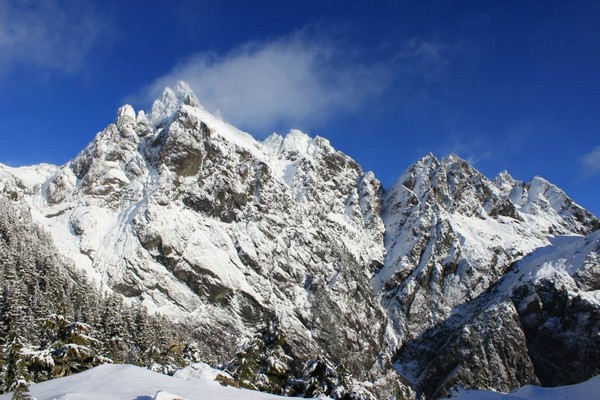
Upon reaching high camp we were relieved to see that the route looked somewhat similar to the conditions of a 1992 picture we were using as beta. We simul climbed the yellow section and pitched out the green and red sections.
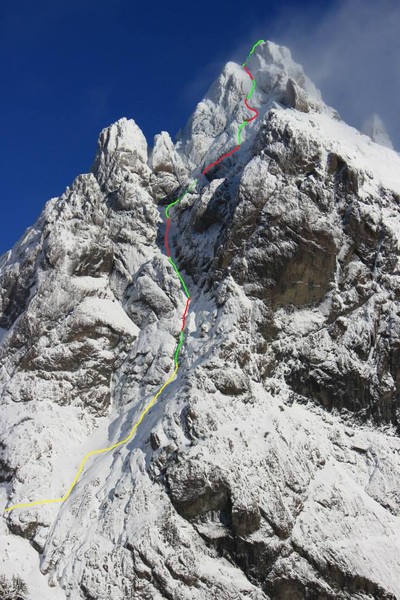
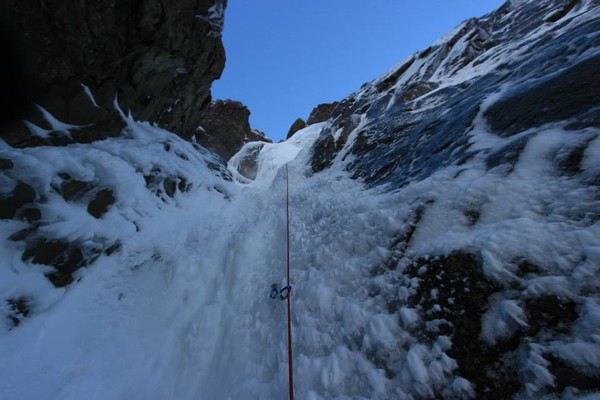
The lower third of the route consisted of moderate angled terrain, most of which was hard pack neve like snow (front point crampon dream) and small blotches of ice with a few rock outcrops. When we scoped out the route the previous day we weren't sure if we were going to exit the lower snow field into a clearly visible chimney or continue moving up and to the right in order to avoid and go around it. Upon reaching the chimney, it was quickly decided (for good reason) that the ice within it needed to be climbed. This is where we started to pitch things out- the exit out of the chimney has a fun grade 3 section of ice.
View looking up into the Chimney:
Once out of the Chimney the terrain mellows once again, as you head straight up towards the left trending ramp that leads you to mid-mountain.
After 3 or so pitches of climbing we reached this belay station. At this point the route turns to the right- when viewed from camp will go behind a rock buttress. As Henrik had on a previous trip descended off the mountain and looked down and seen this ramp, we knew we had a link to the upper part of the mountain.
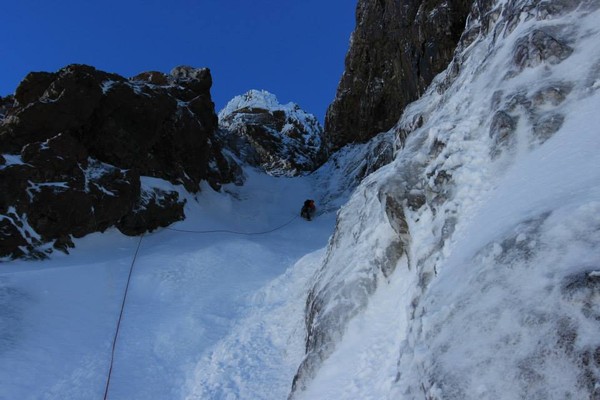
Upon finding the ramp in great condition we opted to quickly transition from belayed climbing to simul climbing mid-pitch and speed things up. We got our hearts going pretty good here as the length of the climb was becoming apparent. Here's Henrik leading the charge up the upper/mid mountain right trending snow ramp:
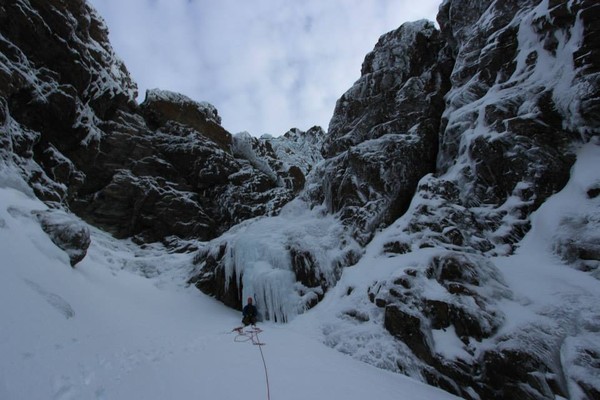
Our simul climb ended when we ran into this pitch of ice. Once off the lower angled snow ramp we were forced to once again climb straight up an ice pitch. Henrik took this photo of me leading a fun pitch of ice:
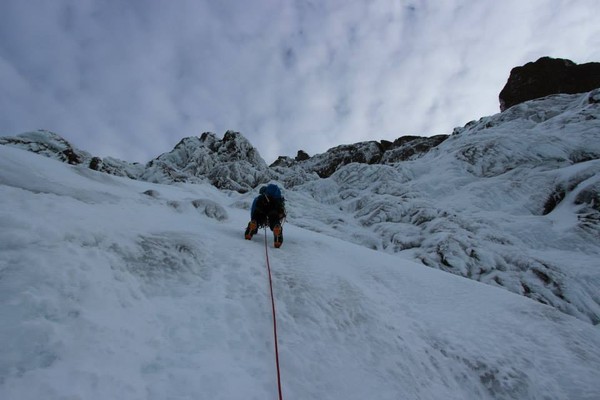
When we scoped out the route the previous day we had concerns for lower down near the chimney and for this section higher up on the mountain. We hoped that the rock beneath was sufficiently covered, otherwise the climbing would slow down significantly if we were forced in a mixed line. We definitely bottomed out a good percentage of screw placements, especially during these two pitches. The ice was good in places, but for the most part was pretty airy- I remember burying the 22cm mid-pitch in one occasion, the rest of the day the 13's and 16's were in use, and their teeth were getting abused.
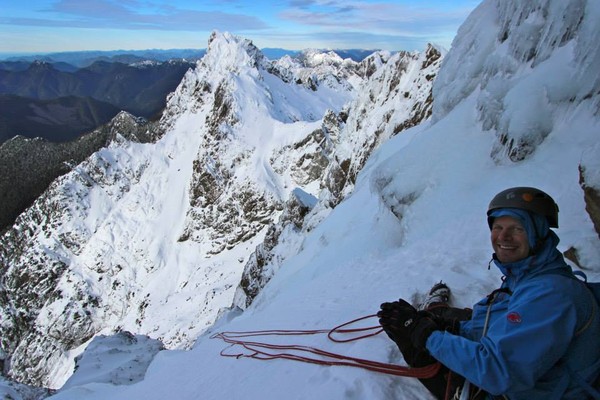
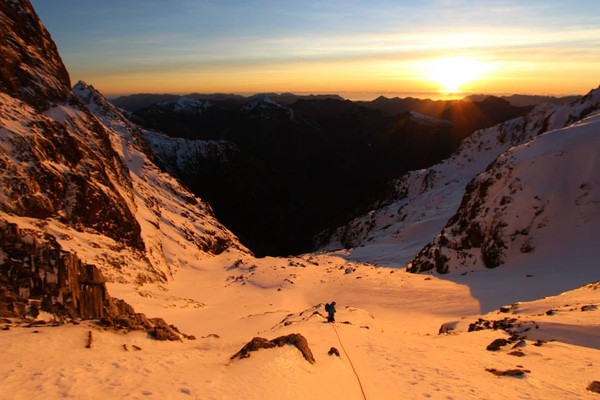
After climbing up I found a solid rock belay and opted to sit down and enjoy the view. We knew we were close to the left leaning ramp which leads to the summit...All smiles to be had today!
After curling around and climbing above my comfy belay with a view, Henrik found a weakness and made an exposed traverse across a steep gully. Once across and above this gully we knew we were close to the upper snow ramp. And sure enough 100 feet out from his belay I was cruising up the upper snow ramp. Once at the top of the left trending upper Mt. snow ramp you're forced to go over the edge of its snow ridge top, down climb on the other side (5 feet or so) on an incredibly exposed snow/ice gully, then traverse 15' across (fortunately there is good pro on the traverse) and then tackle a short section of AI2+/AI3 ice with a monster drop off below. Once over that, there's a couple little benches and you're on the Summit!
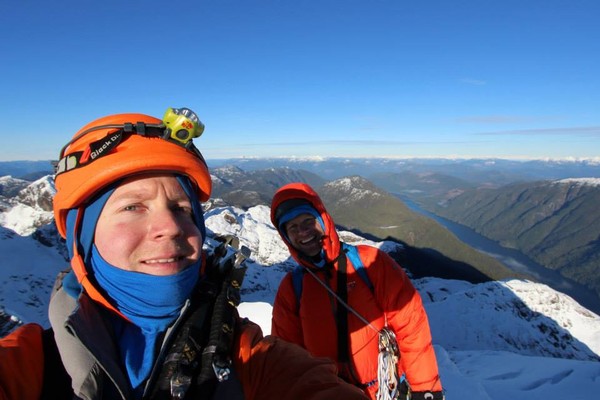
The views from atop Rugged Mt are stunning, and we were fortunate to find ourselves up there on a beautiful day!
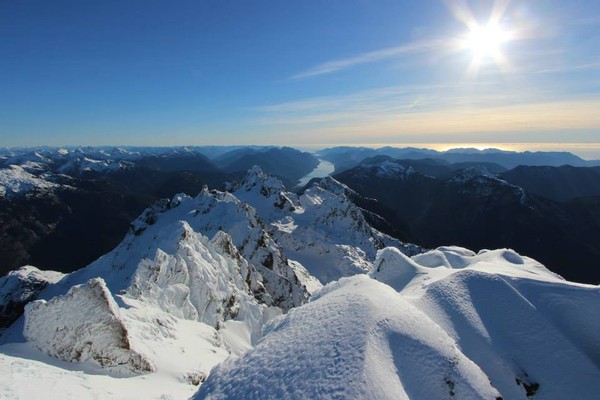
After taking some pictures and talking about the fun times on the North-West face, we descended down the East Ridge. We rapped 25 meters off a v-thread and found ourselves looking down towards the Rugged glacier, and to our delight there were a couple snow ramps leading off the upper slopes directly onto the glacier. Here's Henrik traversing the exposed East Ridge high up on Rugged Mt.
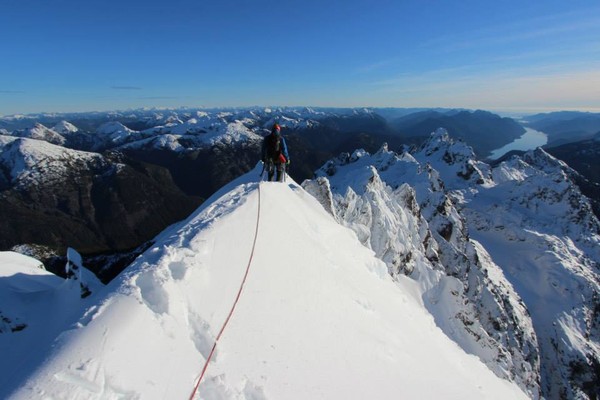
We simul down climbed to the Rugged glacier- if a party so desired it's roughly 3 full 60 meter raps from the summit to the glacier. It's always comforting getting off the tricky terrain before sunset!
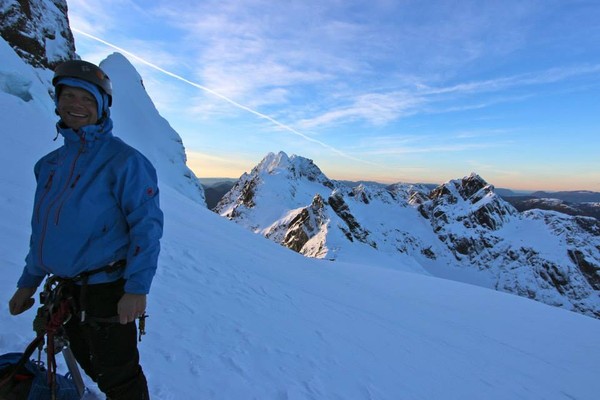
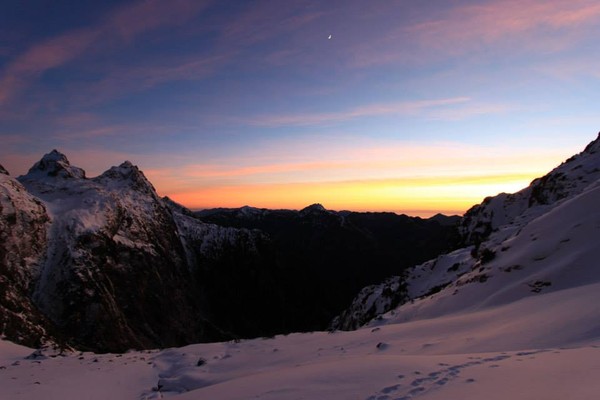
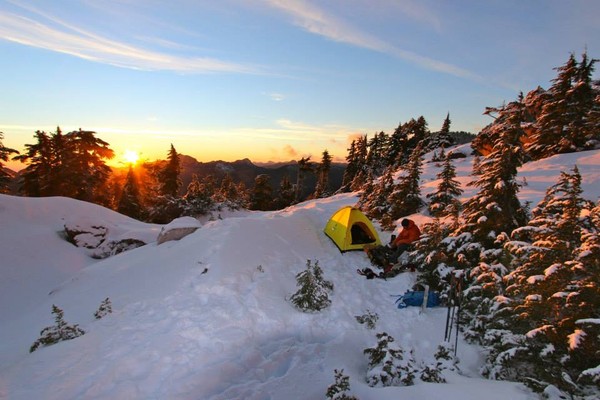
I've been asked by many people over the years how they should go about meeting partners to climb with in the mountains, part of the usual answer I give them is "well get out and you'll probably meet some friends in the mountains!" Henrik and I meet on Rugged Mt. 3 1/2 years ago pretty much where I am in this picture...and yes the sunset that day was awesome and inspiring!
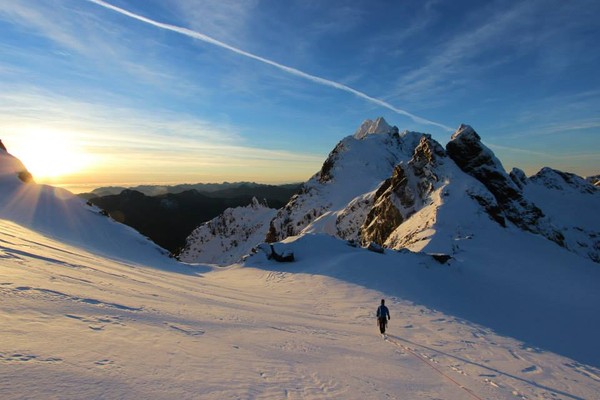
One of the joys about being in the mountains is that every once in a while you're treated to a view that instantly makes you stop and just be in the moment- we had a few of them during this climb and on the descent from Nathan Creek Col we were treated to a few more moments like that:
Going into the climb we knew that most probably this line had not been climbed, and that there were very few winter ascents of Rugged. After asking around and making sure, we have concluded that this is a new route for the mountain, and possibly the 2'nd or 3'rd Winter ascent.
This Winter has seen minimal snow fall on Vancouver Island, and much of the Pacific North-West. The route is much more technically demanding than Liberty Ridge on Mt. Rainier, a D rated route, and felt a lot more like the technical climbing high up on Mt. Waddington rated TD-. If there's more snow on the route some of the funk we dealt with would probably be covered up. The ice pro on the route was so so, there were a few sections (the chimney) where the ice was solid, but a lot of screws went into less than ideal ice. We both had a few healthy run outs along the way. As it stands we opted to call and grade the route: Lee/Hinkkala, WI3, 4, 700 meters, D+/TD-
When we woke up at 4:30 to climb it was -10 celcius, or 14 farenheit. This temperature was perfect, the snow was firm the entire route, and there was no sluffing or any kind. It had snowed in the few days previous to the climb, for the most part the snow pack was well consolidated- the only time we had foot penetration of any sort was on the descent down the East Ridge. I would climb this route again in a flash!
Left Tent- 6AM
Started climbing -7:30AM (fist 45 minutes in the dark)
Summit-2:30PM
Back at tent- 6PM
Approach:
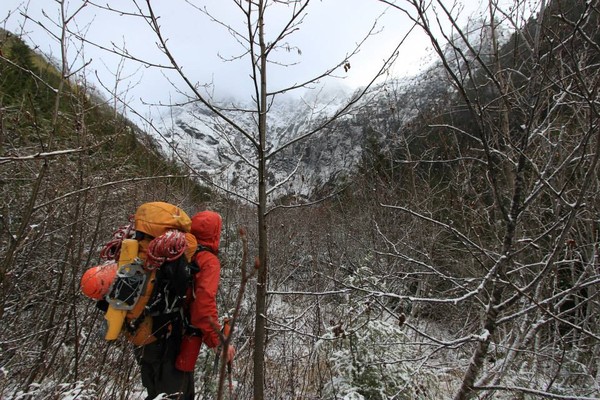
As described in Phil Stone's Island Alpine the most often used approach for Rugged Mountain is via branch N20, a de-activated logging road off the Nomash main line. Unless you're looking to sign yourself up for an epic, use this approach. There was trail maintenance done in the Summer of 2013 making the approach much more bearable. The route is flagged once you're off the road. Here's Henrik eyeing up the less enjoyable part of the approach:
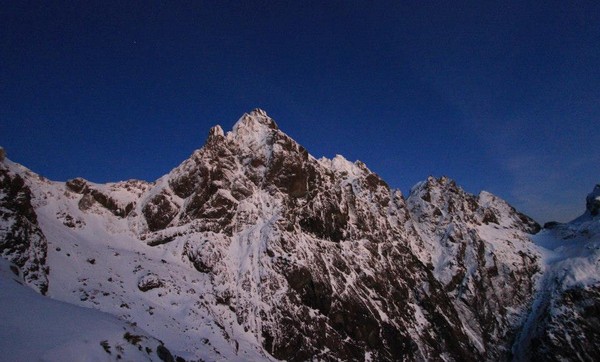
We opted to camp at the same location I had camped the two previous trips in there. We could have travelled more on the first day, but seeing that the conditions were great (the snow was hard), we opted to shut er down early and rest in the afternoon. This also turned out to be a great spot to scope out our route:
We were rewarded with a beautiful sunset that evening:
Gear Notes:
Our Rack Consisted of:
-2 snow pickets
-1 snow fluke/deadman
-7 screws:
2-13's
4-16's
1-22
-Range of Cams from .3 to #2...we used a link cam as our #1 Red
-Half set of nuts (6)
-Half dozen Pins:
2 angles
2 knifeblades
Bugaboo
Stubai Softy
-Bird Beak and Bull Dog
-2 tri-cams
7 alpine draws
4 screamers
We had two 60 half ropes, ended up just using one.
