|
|
Route |
|---|---|
|
|
50.74341°N / 116.93848°W |
|
|
Big Wall |
|
|
Summer |
|
|
One to two days |
|
|
5.10a (YDS) |
|
|
19 |
|
|
V |
|
|
Overview
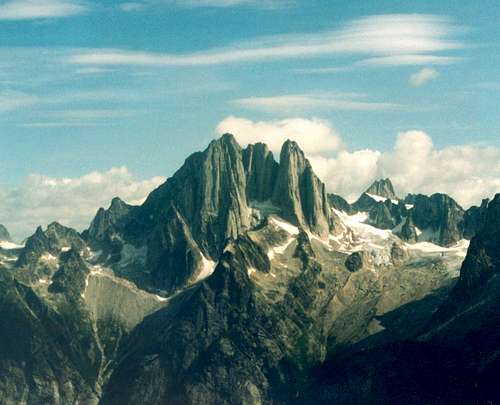
The west buttress of the South Howser Tower is a striking line first climbed by Fred Beckey and Yvon Chouinard in 1961. The line is obvious from the west as it stays more or less right on the prow of the large west buttress, which starts in the ice far below and ascents unbroken to the summit. This route is also one of the most sought after lines in the Bugaboos – more so in the last 10 years as the route has started to lose some of its fearsome reputation. I recently read a trip report from the summer of 2008 where there were four parties on the route at once. One of the issues is that the weather in the Bugaboos can be quite unstable – with afternoon thunderstorms common in the summer. Any patch of good weather tends to send lots of parties off to the popular routes.

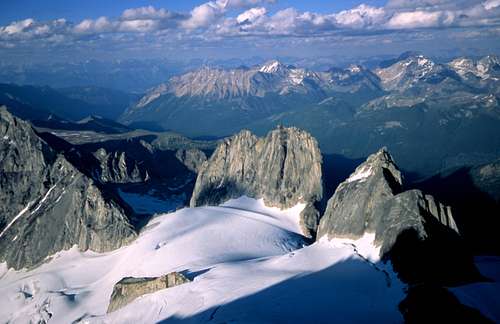
This is a view of the Howser Towers taken from the air - the North Tower is on the left, the Center in the middle, and the South Tower on the Left. The Becky Chouinard climbs the obvious buttress on the South Tower.
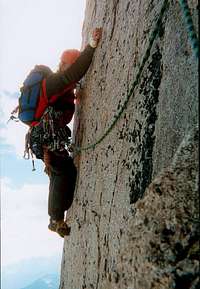
Don’t underestimate this climb – although there is only one section of 5.10, many of the pitches are sustained and in the 5.8 to 5.9 category. The climbing includes off-widths, roofs, squeeze chimneys, and of course jamming. While route finding is fairly straight forward (in my opinion), every year parties get off route. The Becky/Chouinard is the site of many an epic – most of them associated with bad weather coming in while the party is high on the route. Retreat is difficult (but not impossible) as there are no fixed anchors and the climb is 19 pitches long. Often it may be quicker to go to the summit in bad weather and rappel the east side (6-7 rappels from fixed stations) rather than rappelling multiple pitches back down the route.
The Decision – One Day or Two
There is nice bivy ledge at the top of pitch 10. The first decision you must make when contemplating climbing the Becky/Chouinard is whether to do it in one day or two. I know lots of parties who have done it both ways, but my recommendation would be to climb it in one day if you can. You’re more likely to get a one day weather window in the Bugs than a two day window. However, if you are going to climb it in one day, you need to be fast – it’s a long demanding route so you can’t be dicking around.
Essential Gear - What to Take?
On these long routes it’s common for both the leader and the second to climb with packs. Besides climbing gear, here are the things you will likely need to consider bringing:
Crampons and an ice axe – to access and get off of the Howser Tower you need to travel on ice. Between myself and my partner, we took one set of in-step crampons and one ice axe. This was marginal but worked for us – one person had the ice axe (for step cutting if required) and the other had the crampons. The main issue is descending from the Howser/Pigeon Col – it can be icy here so caution is required.
Shoes – You will need shoes to access and get off of the Howser Spires. Again, we choose approach shoes with gaiters to lessen weight. This is also marginal – our feet were dry on the approach, but by the time we had returned to our tent, both of us had wet feet. You need to decide what level of risk you’re willing to take. Boots are better, but heavier – same with crampons.
Water – we took four litres of water total, not including the litre we each chugged down at the bottom of the climb. If you're going for two days, you might want more. There is no snow for melting until you reach the summit area. A stove is excess weight.
Clothing – We each wore wind-proof pants with long underwear on the bottom and long underwear and a fleece (windproof) jacket on top. We brought raingear (top and bottom) as well as down jackets, warm hats and gloves. The higher you get, the colder it is – with ice being present in some crack systems.
Food – We brought very little food – as neither of us eat much on long days like this. Some chocolate and a few Cliff Bars were all we brought.
Headlamps – Whatever you do, don’t forget your headlamps – there’s a good chance you’ll need them.
First aid kit – As well as the normal things, bring a space blanket, lip balm, and pain killers.
The leader generally takes the lighter pack (e.g. down jackets, rain shells, gloves, shoes etc.), while the follower takes the heavier pack (e.g. water, ice axe, crampons, food, shoes, etc.). Even though we climbed the route in a day, we still brought down jackets in case of an enforced bivy.
The Route Description
No matter where you camp (i.e. on the west side of the Towers or at the Applebee campground) – you should be roped up and starting the route very close to first light. From Applebee, allow yourself 2-3 hours for the approach. The beginning of the climb is found by gaining the obvious ridge at the bottom of the buttress and following it up (class 4) until the buttress starts to kick back and no longer looks or feels like 4th class. If you’re coming in from the Howser/Pigeon Col, you will need to descend to a point where it is safe to climb up the rock rib – some parties try to gain the rock rib without losing enough elevation and end up not being able to safely gain the rib (thereby losing time). Don’t worry too much about identifying the start of the route – it’s actually very obvious and more on the right side of the buttress than left.
A topo for the route can be found on this link (go to page 183)
Pitches 1-3 – These pitches climb relatively easy 5th class terrain for three pitches. Stay left on the third pitch instead of heading right into obvious and nice looking cracks.
Pitch 4 – The fourth pitch pulls a small roof at about 25 metres and constitutes the crux at 5.9. It’s a bit tricky, but is all there.
Pitch 5 – More great crack climbing (5.8) on steep featured granite. Try to stay away from the chimney.
Pitch 6-8 – You’re heading for the large (very obvious) left facing dihedral (called the Great Dihedral). All of these pitches climb up to and then into and out of the big dihedral. This feature is one of the most fun on the route and all goes at around 5.8 – with some steeper sections constituting the crux. Belay at stances or when you run out of rope.
Pitches 9-10 – Pitch 9 is an easy scramble up some broken ground, while pitch 10 has a 5.8 section before the bivy ledge.
The bivy ledge – This large ledge makes a nice spot to stop for a drink and a bite to eat. If you are doing the climb in two days, this is your home for the evening – spend a part of your time appeasing the mountain gods, as you want nice weather. If you’re lucky enough to climb it with a spouse, you’ll be hard pressed (no pun intended) to find a better spot to shag. Anyway, back to business…..
Pitch 11 – This is the pitch that we thought was the hardest (5.9), but this will all depend on your climbing skills. The pitch starts on the left side of the bivy ledge and ascends an awkward off-width crack/corner – the pitch finishes off by traversing to the left.
Pitch 12 – Climbs a wide chimney taking the right side (5.8) – the left side is a 5.10 variation.
Pitch 13 – This pitch is rated 5.6, but it is offwidth and if you don’t have some big gear can feel pretty sporty. I climbed it with our one #4 Friend, moving it up as I went until the crack allowed me to place smaller gear.
Pitch 14 – This is another cruxy pitch (5.8 squeeze chimney). The climbing is relatively enjoyable until about half way up the pitch, where you encounter a flaring chimney. You can climb this as a chimney (hard with a pack) or you can stem it. I stemmed it, while my partner (who led this pitch) climbed it as a chimney. Having watched – it’s definitely easier to stem.
Pitch 15-17 – These pitches ascend a gully until you can exit left into a crack that leads into a right facing dihedral. We combined these three pitches into two, just by running our rope out to its full length before belaying (60 metres).
Pitch 18 (or pitch 17 if you combined the previous 3) – This is the advertised crux of the climb. It is a 5.10 traverse to the left across the ridge crest into an easy corner system. I led this pitch and didn’t find it very hard (but I’m a pretty descent face climber). There is some fixed protection at the start of the traverse, but after that it’s unprotected until you reach the easy corner system. Manage your rope well with respect to rope drag. A fall on the traverse for the leader or follower would not be advised.
At the top of pitch 18 you need to rappel down from a notch in the summit ridge (on climber’s right – look for all the slings). From the bottom of this rappel, you make a rising scramble of mainly low 5th class rock to another notch just below the true summit of the South Tower. This scramble will take you longer than you think, as it is almost 100 vertical metres in length. You will probably want to simu-climb this section, and depending on your level of comfort, you might want to belay in a few spots.
Getting Down
The common descent up to last year (2008) was to make a diagonal rappel rightward (climber’s right) down the east side of the South Tower. The rappels start just below the summit at an obvious spot. The rappels are diagonal to avoid rappelling under cornices that sometime form above this face – we were almost killed by a falling cornice when we rappelled (see my trip report for details of that epic descent). The issue with the diagonal rappels is that it is much easier to get your rope struck when its falling diagonally across a face. These rappels aim for the lowest rib of rock on the right (north) side of the Tower. From this rock rib, it is a 40-50 metre rappel over the bergschrund onto the Glacier.
In 2008, apparently there was a new rappel route installed off of the South Howser Tower (perhaps one too many epics). I have not rappelled this route, but got the information from the following link - New 2008 Rap Route. In then event this link is eventually broken, I have cut and pasted the info from this link here:
There is a new bolted descent off of S. Howser Tower. The descent Route was installed apprx 8/17/2008. As far as I could tell a 70m single, or two 50m ropes were required.
Here is the beta as best I can remember:
1) Scramble W. of summit block to find bolted anchor above vertical cube (28m rappel). Then scramble on ledge NW and drop down to another anchor
2) Rappel NW along ridge 30 m. Do not rappel on to N. Face
3) Rappel steep W facing wall to station on climbers left (25m(
4) Rappel steep wall to large ledge (35m)
5) Rappel low angle ledge to gully (32m)
6) Rappel steep NE facing buttress staying climbers right of steel gully (32 m)
7-8 or 9) Stay on buttress and continue rappeling until over Bergshrund.


