Everything you need to know about North Sister

Everything you need to know about North Sister

Page Type Page Type: Trip Report
Additional Information GPX File: Download GPX » View Route on Map
Date Date Climbed/Hiked: Sep 11, 2013
Activities Activities: Mountaineering
Seasons Season: Summer

Everything you need to know about North Sister

Here's the scoop on how to climb North Sister late-season, after all snow has melted.
In a year of typical snowfall, this period is usually between mid-August and mid-September.

As of 2013 I've climbed this peak 6 times, early season with snow and late season without.
While many people say they prefer snow, I think the chances of success and overall safety are increased by climbing it after the snow is gone.
The multiple pitch, spicy 45 degree+ hard snow traverses are transformed into easy class 2 and 3 scree scrambles that take a few minutes for the competent Cascades scree aficionado.

This beta is for the standard SW Ridge route with a team of six or more. North Sister is often climbed late-season with no rope, no pro, and in running shoes by those comfortable on unstable scree. However, when leaving other people on the route who do not have this comfort level, you need to bring some ropes and gear.

Gear
Suggested gear: two ropes (60m preferred).  Four or five small cams.  I like Metolius: 1 red, 2 yellow, 1 orange, 1 blue. Slings and biners for each cam. One cordelette.
Hexes, tricams, and stoppers are not needed.

Approaches
1) Pole Creek trailhead (elevation 5,300 ft) to lower Hayden Glacier Camp (7,200 ft). About 5 miles and 1,900 foot vertical gain.
2) Obsidian trailhead (4,800 ft) to camp at Arrowhead Lake (6,900 ft). About 5.7 miles and 2,100 foot vertical gain.
Pros and cons: Pole Creek approach is slightly shorter and faster. Obsidian approach and the Arrowhead Lake camp is much more scenic  Obsidian requires a permit (in 2013 $6) that you need to reserve far in advance. 
Take your pick.

The rest of this trip report assumes the Obsidian trailhead. Both approaches use the Southwest Ridge as the main ascent route.

Approach hike via Obsidian trailhead
Hike a gentle ascent on a well-graded trail through trees. Cross lava field after about 3.5 miles. On the far side of lava field, cross a small creek. About 100 meters past the creek is a fork in the trail. Take the left fork. (In 2013, this left fork was marked “Minnie Scott Spring”.) Ascend a steeper trail with a creek on your left for about 0.8 miles to a junction with the Pacific Crest Trail. Take a right on this junction and hike about another 0.8 miles on the PCT. A large horseshoe shaped crumbling bench will come into view on your left. Arrowhead Lake is on top of this bench. You will see an obvious climbers trail cutting left off the PCT, across a meadow and small creek, and up the valley to the left of the buttress. Take this trail up the valley about 15 min, then ascend right up to the top of the bench when it's safe to do so. Enjoy the nice campsites around the lake.


Click on all photos to bring up a larger original (with legible text)

 
PCT to camp


Ascent route from Arrowhead Lake to base of SW Ridge
A reasonable climber’s trail ascends from the Arrowhead Lake bench up to a large rock protrusion called the Black Fin. Climb up just to the right of the Black Fin, and then take a right and scramble over alternating sections of boulders and snowfield until you get to the pass between North and Middle sister. This route skirts the upper reaches of the Collier Glacier to the west. If you have crampons, ice axes, and glacier gear, you can get onto the Collier from the Black Fin for a slightly faster approach. However, in late-season, I've never carried this type of glacier travel gear, and therefore want to avoid any kind of crevasses.

route from Arrowhead Lake
This photo shows the ascent route from Arrowhead Lake up toward the Black Fin. There is a decent climbers trail up through here that you can follow in the dark.


Gain the SW Ridge
You now have to deal with a little bit of scree groveling to get up onto the Southwest Ridge. Possibly the best way to do this is on the slightly blocky, rock section to the right of the red band is seen in the photo below. It's not much fun anyway you do it, but once you get on the ridge proper the climbers trail is actually pretty decent. (When you descend, the red gravel in the middle is wonderful scree skiing and definitely where you want to be!)

North Sister - SW ridge
This is probably the least fun section of the whole route on North Sister - gaining the Southwest Ridge from the upper Collier Glacier. This is a few hundred vertical feet of some pretty loose sand/gravel/scree. Just put your head down and go for it.


Looking up the Southwest Ridge
Once you gain the actual Ridge and get past the evil scree, it's actually a pretty pleasant walk for about 10 min. until you start traversing toward the summit block.

Unnamed Image


Get to the summit block

Once on top of the Southwest Ridge, you have a series of easy traverses followed by short gully climbs to get you over to the actual main summit block. The photo below should pretty much say it all. Be very mindful of rockfall from your teammates when you're in the sections marked in blue. These gullies are very loose.

North Sister  - complete route
Here is an annotated photo with a complete route across the upper summit Ridge. I think the text pretty much says it all. Feel free to save this onto your smart phone or print it out for your North Sister trip. (Click the photo for a larger image.)


Note that in section number six, you traverse for about 200 meters on the East of the summit ridge. Enjoy the spectacular views down to the Thayer Glacier.
Section number seven is the first of what could be roped technical climbing. In early-season this is a steep (45 degrees+) snowbowl with a L O N G runout. However, in late-season, this is easy class two scree for about 100 meters.


Section number eight: the so-called Terrible Traverse. With snow, most people like to have four pickets and maybe an ice screw to protect this. When the snow is gone, it's pretty easy third class scree, but with about 30 feet to cross of a nasty gully/runout. Less confident climbers will appreciate having a fixed line here.  An anchors can be made at a large boulder at the start of the traverse, using two small cams (yellow and orange Metolius).

North sister summit detail
A close-up, annotated photo of the North Sister summit block.  A common mistake here is to head up the gully to the left, or north of the Bowling Alley. It's marked here with a red X - avoid this area!


North sister - terrible traverse
Here's a climbers view of the start of the so-called "Terrible Traverse" on North sister in late-season. When this is snow-covered, it can be a pitch or two of 50° alpine ice which will require your full attention. However, in late-season when the snow is gone, it's an easy third class scramble. There is a brief section with a bad runout, so larger climbing teams will probably want a fixed rope across it. Use several small cams for anchors at either end. (As mentioned in some of my previous photos, please avoid the common mistake of ascending the gully with the red X marks.)


The rope can be fixed on the far end with a single well-placed yellow Metolius cam. If you have a large team of people, bring two ropes and leave one of them fixed on this section for the return trip. A 50 m rope works fine here.
Be mindful of random mountain rockfall from above on this section, and have people cross it quickly. More confident climbers will not need a rope on this section.


Unnamed Image


At the end of the terrible traverse, the angle eases up and you can get off the rope. Traverse about another 50 m to the base of a reasonably solid rock buttress. This is the base of the bowling alley. Note the red X area left of the bowling alley. This is probably the place where most people make a route finding mistake by going up this gully. This is not the correct route! You may see some slings of to the left of this gully. Those are slings from people either bailing or coming up North Ridge.

Base of bowling Alley
Entrance to the bowling alley on North sister. This is a fourth class step of about 30 feet. It's pretty easy to solo, but with a larger group you probably want a fixed rope.


About a 30 foot ledge/step gets you into the bowling alley. Protect this area with a fixed rope. A 60 m rope will make it from here to the boulder in the middle of the bowling alley. This can be protected with a red 1 inch cam.
(Alternatively, there are some small pockets on the left side of the bowling alley below the boulder that take a small cam. I placed a bomber yellow red hybrid alien there on my last trip.)

BA fixed rope
Here's a climber entering the lower bowling alley on a fixed line. A 60 m rope reaches the large boulder in the center of the bowling alley. A red Metolius cam protects this nicely.


Once in the bowling alley, get your climb team off to the left in what I call the alcove. It's a large bowl shaped area that can hold the entire climb team, and keep them out of the way of any rockfall. Get your whole team to this point before you start climbing above this area.

Bowling Alley alcove
At the base of the North Sister bowling alley, is a large reasonably comfortable place for your entire climbing team to hang out. I call it the alcove. It will probably be in the shade and a little chilly, but it's out of the way of almost any rockfall.


In the alcove, there is one point that I found for a belay anchor, a nice threaded hole in the rock.

anchor in Bowling Alley
Chockstone anchor point at the base of Bowling Alley. This is about the only decent place to anchor a rope in the entire lower section.


Once your climb team is all in the alcove, you start to lead the final pitch. I prefer to run it out to the big boulder in the middle of the bowling alley, place a single red Metolius cam for gear, and then run it out to the lower rap anchor, clip that for pro, and then head up to the upper rappel anchor and fix the rope here. Have everyone climb on a friction knot on the fixed line, and you are on the summit ridge, congratulations.

leading the bowling alley
Leading the bowling alley.The big boulder in the middle offers the single best gear placement, about a 1 inch cam. This reasonably solid fourth class, and this section is often soloed. The top of the pitch is the rappel slings.


The actual summit, slightly to the north, is made a better rock and is not as steep as it first appears. Be sure to have everyone out of the bowling alley and on the summit ridge before anyone traverses over to the true summit. There are loads of rocks on this short traverse, and any of them they get kicked loose will go right down the middle of the bowling alley and nail anyone unfortunate enough to still be there.


Comments

Post a Comment
Viewing: 1-13 of 13
EastKing

EastKing - Oct 7, 2013 5:39 pm - Voted 10/10

Nice beta

Thanks for putting this trip report up. I will use it for my beta for next years climb.

johngo

johngo - Oct 7, 2013 7:55 pm - Hasn't voted

yer welcome!

Eastking,

You are very welcome, good luck on your climb next year.

mrchad9

mrchad9 - Oct 31, 2013 12:40 pm - Voted 10/10

The BEST TR ever.

No exaggeration here, but this is argueably the best and most useful trip report I have ever seen submitted to the site! Thanks so much for all this effort... I know it isn't a quick job.

Also johngo... when replying to someone (like with EastKing above), use that little 'reply' link next to their comment. This causes your response to show on their profile page. Otherwise they are much less likely to see it.

I hope to climb North Sister in the next 1-2 years. When I go I now have exactly the resource I need!

rick6003

rick6003 - Oct 31, 2013 9:55 pm - Hasn't voted

too late!

Johngo,
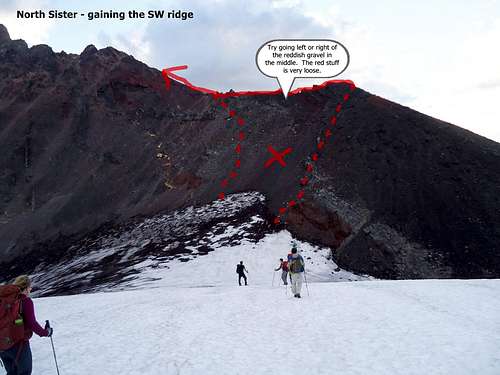
wish you had posted this before September, we gave it a try from the Obsidian side. Late start from below arrowhead lake,the mountain looks deceiving close, and some weather started to form around the other 2 sisters. We made it as far as the ridge where the red starts. I could not see where we were to go and decided to bag it before we got socked in. Mt. Jefferson was much more easy to find the route on. Try next year with your info to help guide us. North and Middle will be the last of the 10k plus in Oregon for me.

mountainsandsound

mountainsandsound - Nov 2, 2013 10:11 am - Hasn't voted

Man...

What a scary looking choss pile! Hats off to you Oregonians, you true volcano connoisseurs. I prefer my volcanoes with a layer of ice.

Great write up, I'll probably refer to this when I head down that way.

triyoda

triyoda - Nov 2, 2013 3:27 pm - Hasn't voted

Nice report

Thank you for providing such a detailed description, it really makes it clear exactly what one is getting into on N Sister. I think after reading this it confirms my desire to do this late spring/early summer instead of taking on the scree.

Sean Rule - Aug 23, 2016 12:46 pm - Hasn't voted

Some more beta!

Thank you, friend! This is a wonderful resource! Made our summit bid last weekend a bit easier. :)

A few more pieces of info that might help:

1) For those approaching from Pole Creek TH: take the main trail south until the Camp Lake intersection (immediately after you cross Soda Creek), then turn west. When you get to a clearing (maybe 1-2 miles), and the trail turns south, look for the climber's trail that continues up a small hill and west. From there, after 45 or so more minutes of hiking through gradually smaller brush, you'll hit treeline. There are beautiful places to camp right before you get to Hayden Glacier.

2) Camping near Hayden also puts you in great position to climb either the SE Ridge of North Sister or, alternately, heading up parallel to Hayden to the saddle between Prouty Peak and North Sister and doing the South Ridge. We did the SE, but agreed later that we should have done the South.

3) Definitely descend the South Ridge! :)

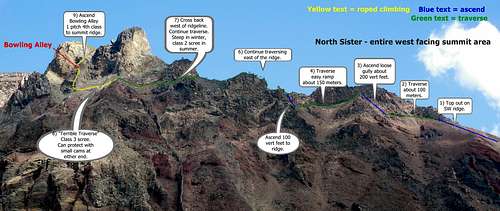
4) From the South Ridge, the wonderful topo above applies.

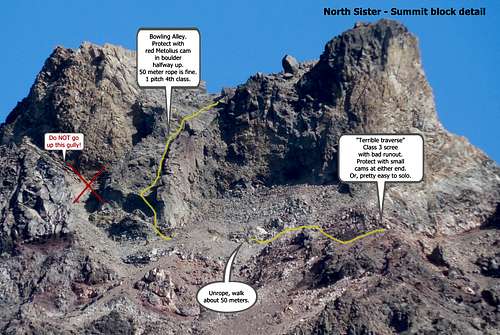
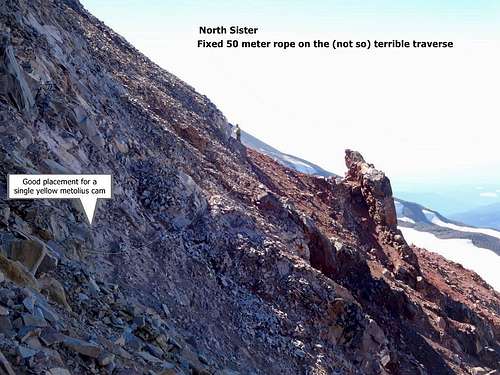
5) There's a fixed pin on the "Tiny Traverse" (the one immediately before the "Terrible" one). It's about 8 feet above the deck, halfway across.

6) I'll be damned if I could find the cam placements mentioned above. Of course. knowing how solid (ahem) this mountain is, they may have fallen off. :) Good (small) cam placements do exist, though...as well as decent constrictions for stoppers, so you might consider bringing a set.

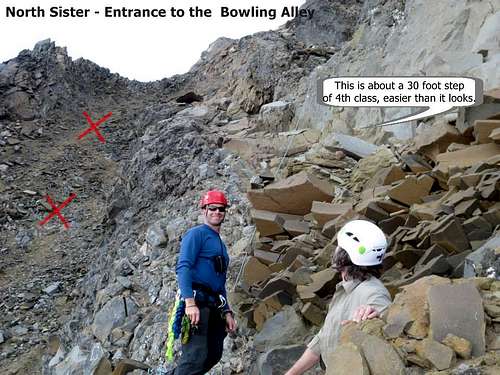
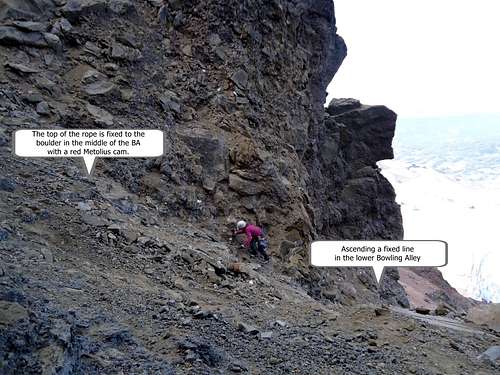
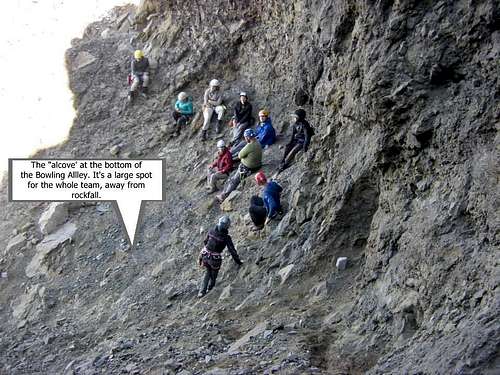
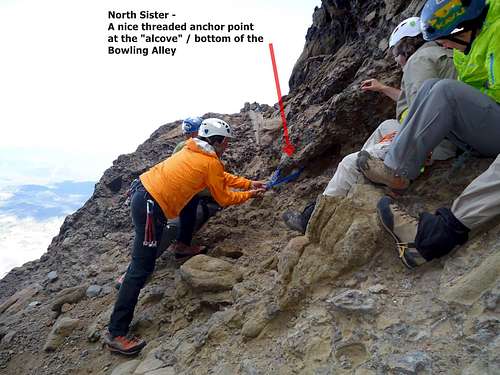
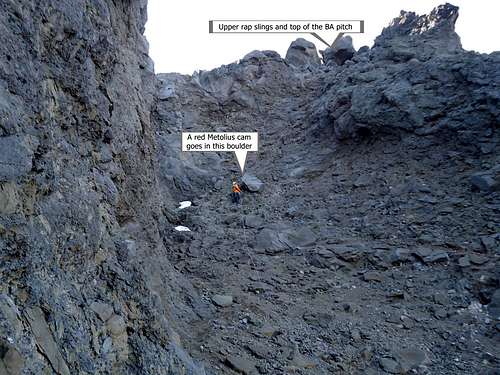
7) We came into the Bowling Alley after climbing in solitude for 4 hours to find a large group (11) occupying a fixed line from the BA to the summit ridge. In addition, about half of this party was summiting at the same time. If you find yourself in a situation like this, you *can climb out of the BA to the right of the normal chute; the rock is fun, not exposed at all, and surprisingly solid. Your belayer can belay from the safety of the alcove (through that thread), and a 200' ripe gets you to the rappel station with about 15' left over. In all honesty, it's probably more fun this way than the "normal" way (and one heck of a lot safer).

8) Please heed johngo'd advice about keeping the party together in the BA. As we were roping up for our alternate pitch, the first few of the party of 11 were summiting. Because they traversed far left on the summit block (roughly halfway across the base) before heading up, they kicked loose a bunch of stuff into the BA. The summit block is delightfully solid (sheesh, it's still *there, right?), and it climbs like Theilsen. As you get to it, traveling northward on the summit ridge, climb it as soon as you can and savor the last 30 diagonaling feet to the top.

9) A single 60 meter rope allows you to rappel through the BA to just above the thread.

10) I climbed the route in trail running shoes. They worked great. :)

Thanks, johngo! This was a great report!

johngo

johngo - Aug 23, 2016 1:06 pm - Hasn't voted

Re: Some more beta!

Hey Sean,

Thanks for the good vibes. I'm glad you had a successful climb.
Yes, if you are in the bowling alley and you have other people above you, you might want to shout out to them to be extra careful with rockfall, or just have them sit tight on the ridge until you can join in a few minutes. Any rocks kicked off from near the summit block will go down into the bowling alley and be bad news for anyone who is down there.

Also, with a large group like that, you can probably hitch a ride on their rope if you wanted do. But, sounds like you were faster anyway… Congrats!

Sean Rule - Aug 23, 2016 2:15 pm - Hasn't voted

Re: Some more beta!

You bet, friend! Thank YOU for the wonderful report - a lot of work went into it, and it was an awesome primer.

NS is a pretty awesome volcano - just committing enough to keep your attention (constantly), but not so kamikaze to be overtly dangerous. Stoked she let us up. :)

Be well!

SasangDoc

SasangDoc - Jul 20, 2020 10:45 pm - Hasn't voted

Re: Some more beta!

Thank you Jongho and Sean! How many ropes do you suggest I bring (solo climber)? From Sean's response I'm guessing 2 x 60m ropes. One to use while ascending the Bowling Alley and one rap from summit... ? ... BTW I'll be climbing in early August of this year. Thanks again guys!

johngo

johngo - Jul 21, 2020 10:32 am - Hasn't voted

Re: Some more beta!

1 rope is fine.
Many people don't even use that.

SasangDoc

SasangDoc - Jul 25, 2020 10:13 pm - Hasn't voted

North Approach

Thanks for the added beta Johngo. Say, have you ever tried the North ridge approach? Looks like the 3 sisters marathoners take this route.

Serge

Serge - Aug 25, 2021 4:53 pm - Voted 10/10

Thanks for TR

Thank you for the excellent TR!
Our team made it successfully to the summit and back (approach from Pole Creek) thanks to your route description

Viewing: 1-13 of 13