
-
 11532 Hits
-
 82.48% Score
-
 15 Votes
|
|
Mountain/Rock |
|---|---|
|
|
45.14185°N / 109.82858°W |
|
|
Hiking, Mountaineering, Trad Climbing, Scrambling |
|
|
Spring, Summer, Fall |
|
|
12000 ft / 3658 m |
|
|
Overview
Here's a real gem...The Villard Spires are a group of very formidable looking towers spanning a long rugged ridge south of Mount Villard in the heart of the Beartooth Mountains of Montana. They sit about 1.75 miles southwest of Granite Peak, the highest point in Montana. They have been a mystery to just about everyone, including long time local climbers of the Beartooth/Yellowstone area but hopefully this page does well to explain them and provide reliable beta for anyone so inclined to climb them.
This group of towers has drawn some controversy regarding their name, elevation, and prominence due to the lack of detail on the USGS Granite Peak quadrangle. I have heard of three different names for this group of spires but in an attempt to avoid confusion, I have used the name "Villard Spires" in reference to their proximity to Mount Villard. The other two names you may hear include the Cathedral Spires and simply The Spires (which is the name shown on the USGS Quad.
Regarding the elevation of the highest spire, the Granite Peak Quad shows an 11,848 foot benchmark on the southern tower but by looking carefully, the tower to the north might have a 12,000 foot contour but its so hard to tell since the "I" and the "R" and the "E" from the word "Spires" on the map obstruct it...not to mention the lines are so close together since its basically a vertical cliff. Another question mark is the prominence. Mount Villard is the parent peak but locating the saddle on the map is a chore and trying to determine the elevation of the key saddle isn't easy either.
Until now, I have been very mystified but I have recently climbed the highest one and can provide some answers. This page is currently the only beta on the interwebs about these spires and I can say the extra effort to climb the high point (HP) is more than worth it.
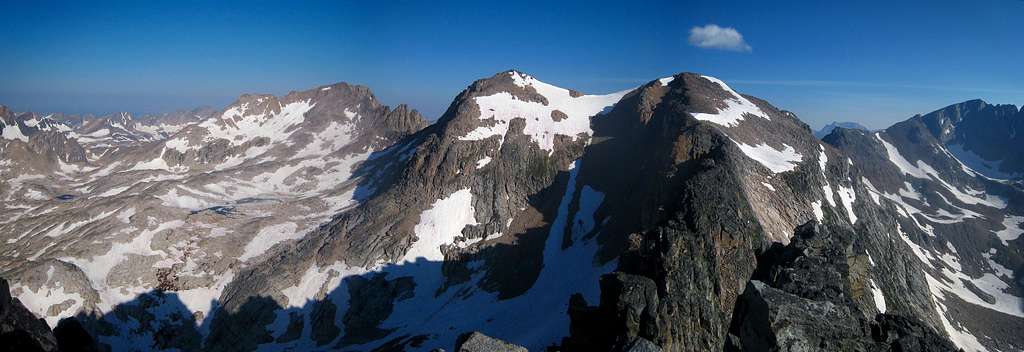
 The Villard Spires from camp above Upper Aero Lake
Elevation and Prominence
After much research, I have chosen the elevation to simply be 12,000 feet making them worthy of the Montana 12ers list. This was decided based on a GPS reading at the highest spire, the USGS Quad and hours of Google Earth tests. The few people I did meet that claim to have completed the Montana 12ers may want to do this climb as well. Determining its prominence was even harder though and I have chosen 300 feet purely on personal estimate of how big the drop was to the key saddle with Mount Villard looking over the summit to the north.
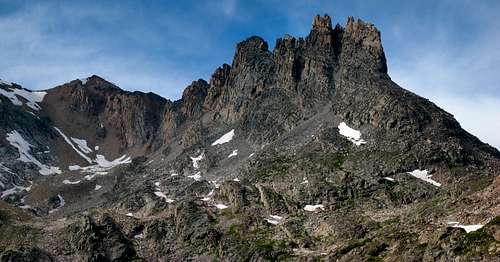
 The Villard Spires from the east
Getting There
AERO LAKES TRAILHEAD
This trailhead is used to approach anything along the south side of Granite Peak and nearby peaks. From the small town of Cooke City on US Highway 212 (Beartooth Highway), drive east for 2 miles and turn north onto Lulu Pass Road. Go 2.5 miles (mostly gravel) to a large junction (Goose Lake junction) and locate a short road off to the right. Turn right (east) onto this road and continue for a rougher (but still passable for most cars) quarter mile to its end at a small mining cabin with mining relics scattered around. There is room for about 6-8 cars here to park.
AERO LAKES APPROACH
From the lower trailhead, there is a large cabin nearby just to the east. Walk around it on the left side (passing an old hot water heater) and cross a small stream on some boards or rocks. Emerge on the trail after a few feet of bushwhacking and walk northeast on the trail passing a large sign for Lady of the Lake. The first part of the trail heads up a short steep section and mellows to a nice undulating hike through sparse forests reaching the south end of Lady of the Lake at 8,750 feet after 1.5 miles. Follow the trail around the west side of this large lake (with great fishing and camping) and reach the junction with the trail coming down from the upper trailhead after another mile. A large cairn marks this junction. Continue straight and pass around a large meadow and cross a small creek which flows back down to Lady of the Lake. Don't follow this creek as it curves back to the south. Utilize rocks and logs to get across, then stay on the trail heading up through some trees and reach an obvious (but unsigned) trail junction 0.5 mile from the creek crossing. A few logs block a trail heading straight, however this trail is the route for the Sky Top Creek Approach described below. I will call this trail junction the Tri-Creek junction since it's where Zimmer Creek, Star Creek, and Sky Top Creek converge to form the Broadwater River. For the Aero Lakes route, you want to take the left trail. Your first views of Mount Zimmer and Iceberg Peak are found here to the north. A few minutes beyond the Tri-Creek junction, cross Star Creek a few feet before it dumps into Zimmer Creek and continue up the trail which follows the west side of Zimmer Creek for another mile. When the trail once again reaches the creek side, cross it on a couple large logs at 9,150 feet and locate the trail heading northeast towards Aero Lakes. This junction is unsigned so don't miss it and continue up Zimmer Creek. The trail quickly begins to climb steeply for 900 feet up what is known as heartbreak hill, reaching Lower Aero Lake after another 1.1 miles at 10,000 feet. The final quarter mile to the lower lake is hard to follow, just follow large talus through an obvious gap and descend 50 feet to the lake shore.
Here at the lower lake, the official trail ends (5.4 miles from the TH) but a boot path heads west around the lake, reaching its southwest corner after 0.3 miles which has a nice calm area making for great fishing. Continue along the northwest shore for another 0.9 miles and reach a small stream coming down from the northwest which drains a small lake above and to the north. Descend 50 feet to the creek, cross to its east side, and follow this drainage up to a very broad 10,160 foot saddle. Descend a short ways to the upper lake outlet stream and find a place to cross it. Wading may be required in early season. Reach the Upper lake at 10,170 feet and hike east around its south shore, then north around the east shore for 1.3 miles from the outlet. Stay close to the shore on the east side to avoid annoying talus traversing. Begin an ascending traverse and cross a small stream reaching a small tarn at 10,330 feet (200 feet above Upper Aero Lake). The camping at this tarn is fantastic and out of the bugs that flock the lake shore below. Views of Glacier, Villard, the Spires and the upper lake below are out of this world! This beautiful spot is 3.3 miles from where the official trail ends making the total distance 8.7 miles from the trailhead with only a 1,500 foot net elevation gain.
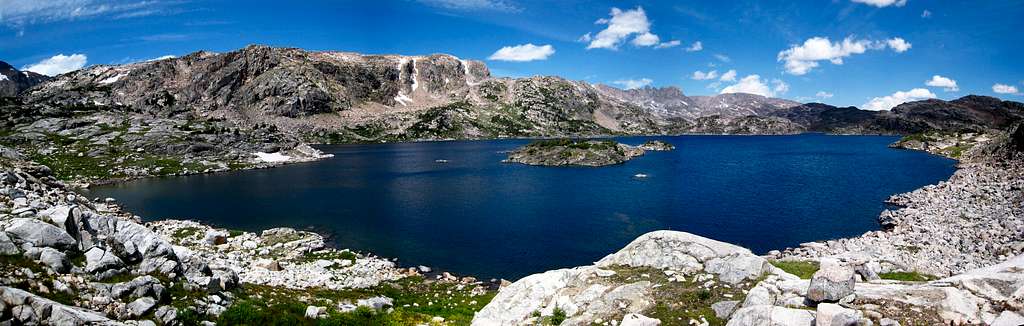 Lower Aero Lake Panorama from the end of the official trail
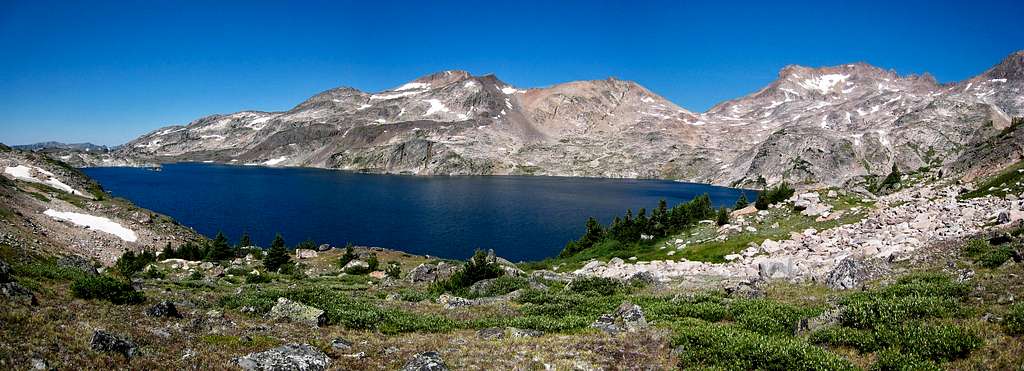 Upper Aero Lake Panorama from the camp spot
Standard Route - West Ramp Class 3
From the Upper Aero Lake camp described above, hike up grass and talus towards the 10,840 foot saddle just south of the spires. Just before reaching the broad flat saddle, begin hiking north on grass and some talus. Cross a small gully and begin ascending and aim for the obvious ramp traversing up the west face of the spires. Just past the gully (which dumps steeply down to Upper Aero Lake), an 8 foot cliff band is reached and is climbed using one of a few Class 2+ cracks. Once above this cliff band, the terrain eases to grassy ledges. Ascend these ledges to a talus fan and make an ascending traverse across the talus to the start of the ramp. This is the only real loose rock on the route.
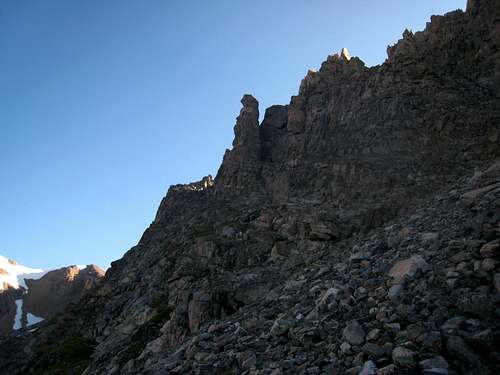 View of the start of the west ramp from the talus fan View of the start of the west ramp from the talus fan |
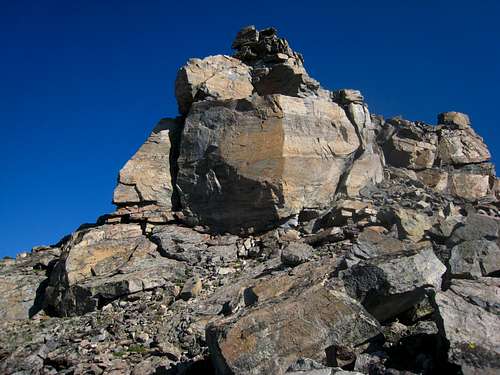
 View of the Spires from the 10,840 foot saddle to the south View of the Spires from the 10,840 foot saddle to the south |
Begin ascending the very wide ramp which is key to the route. This ramp provides the only weakness in this set of spires and must be found and used. Traverse right below a large, detached, free standing pillar where the ramp narrows slightly but is still fairly unexposed. About 100 feet above the base of the pillar, the ledge abruptly ends at a large gash sweeping up the west face. This next part is the crux of the route. Cut right here and traverse about 20 yards across a very exposed, narrow ledge to the gully. Most of this traverse is fairly easy as it's 3-4 feet wide but the crux is a wildly exposed 5 foot long section that's only 6 inches wide! A good crack about head height is used for hand holds (Class 3). Once in the gully on the other side you can breathe a little easier.
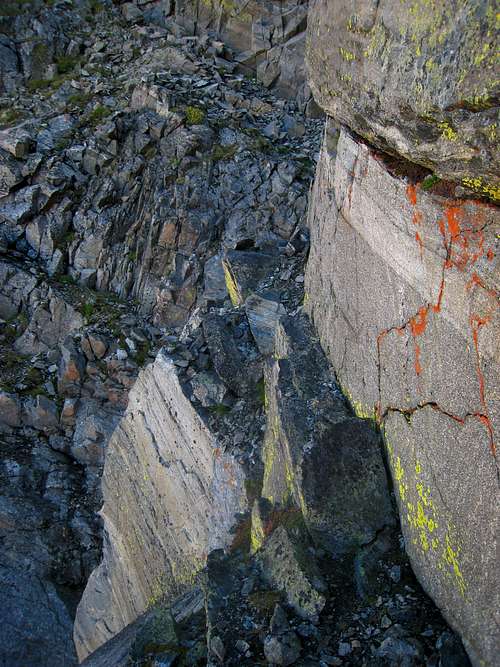 The Crux Traverse The Crux Traverse |
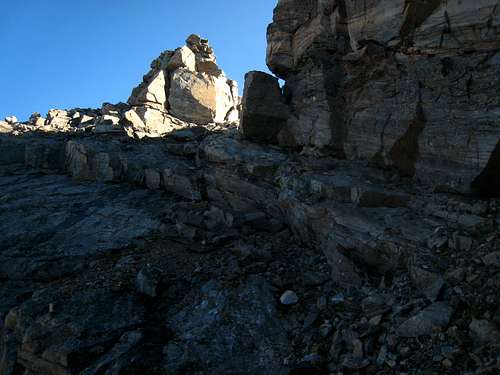 Upper section of the ramp with the summit block in the sun Upper section of the ramp with the summit block in the sun |
 Summit block from the upper col. Traverse left here. Summit block from the upper col. Traverse left here. |
Climb 50 feet up the loose talus strewn gully and cut back left onto the continuation of the wide ledge you were on before the crux. Climb another 100 feet up the now wide ramp passing below another prominent tower. Reach another gully that cuts the ramp but this one is much easier to traverse into. Veer right on a much easier ledge and reach the base of a series of potentially wet slabs. Scramble up these slabs avoiding wet spots and pass below a large overhanging block and reach the col just south of the summit. The large tower furthest north is the highest spire so continue on an ascending traverse around the left (west) side of the cliffs immediately north of the col until it's possible to climb Class 2 talus directly to the summit.
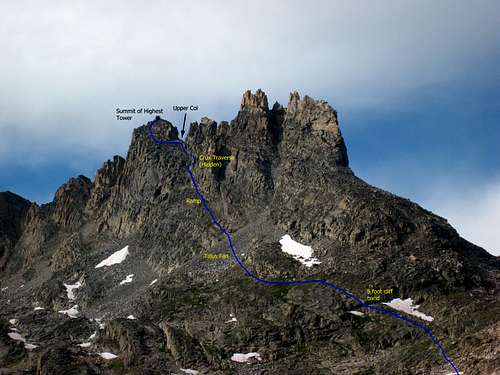 Villard Spires HP route topo
A variation of the route described above that avoids the narrow ledge traverse is to just scramble up from the base of the deep gully cutting up the west face. It is reportedly a steep scree gully until reaching a big chockstone, at which point it's a class 4 scramble up ledges just to the side of the gully. When you reach the elevation of the narrow ledge traverse from the route described above (you'll see it to climbers right across the deep gully) you'll meet the main route and can continue up the final bit to the upper col and then to the summit.
Thanks Erig G for finding this alternate route!
Summit views
 Villard Spires HP summit view of Glacier Peak and Mount Villard
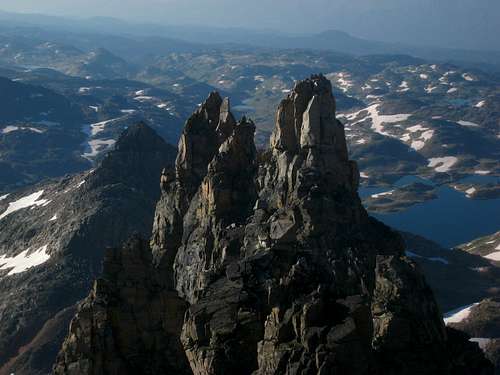 Looking south down the spine of the Villard Spires
Map
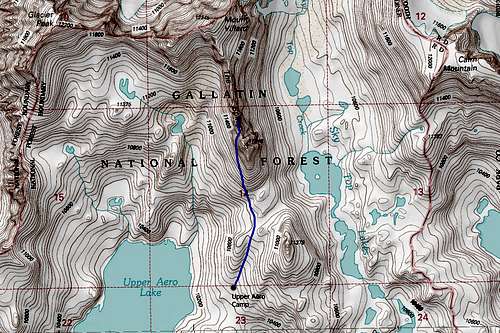 Villard Spires HP Map
Other Spires
The highest spire is certainly the easiest one to climb of the group. There are at least 10 other spires, many if not all of them have probably never been climbed. I was starting to even think the highest one was unclimbed until I saw a cairn at the top. Due to the seriousness and difficulty of the remaining towers though, each requiring many technical pitches in or above the 5.9 range I would bet the first ascent potential here is huge....if you are willing to carry technical gear all the way up here. From what I could tell, the rock looked great for climbing and protection but large loose blocks were found strewed around that would have to be avoided if anyone decided to embark on a technical ascent.
When to Climb
Summer climbing season is short in Montana. Late July through early September are the months that are most snow-free. However, expect some snow on the mountain any time of the year. Expect any type of weather any time of the year. Violent thunderstorms are a common daily occurance. Get an early start to avoid afternoon thunderstorms. Storms develop very fast and tend to come from the south or west.
External Links
Ha...if you find any regarding climbs of any of these spires, let me know!